
Don’t have an existing form on your site or a webservice you can call to collect your form data? You can send all the data filled in by your users to a Google Sheet.
If you want to send your form data using a URL of your site or via a web service, the article you are looking for is this one!
In this section, you will learn:
- How to configure your Google Sheet in order to collect data
- How to set up the Events section on the Widget Studio to send form data to the Google Sheet.
No technical skills are required to perform the following instructions. You will only need about 5 minutes to complete them all.
Configure your Google Sheet
- Go to Google Sheets and create a new sheet. This is where we’ll store the form data.
- Name your tab “Sheet1” (which is the default name given to your tab if english is the language used in your Google Account)
- Set the following headers in the first row:
| A | B | C | |
| 1 | Date | Form element name // field 1 | Form element name // field 2 |
| 2 |
In details:
- Always write “Date” on the first column A. It will be automatically filled with the date and time the user submitted the form.
- Then, starting from column B, each column is corresponding to a specific field of your form. For each column, you need to write the form element name of the corresponding field.
The form element name is different from the element name. A form element name is automatically attributed to your field when you add it to your form.
To find it, select each field element, and unfold the section Form settings.

In the image above (from our use case), an input field is selected.The name of the element is Email, but the Form element name is different. In the example above, it is circled in red and its value is input_kn8u23ie9sy.
Thus, you will have to cell B1 like that:
| A | B | C | |
| 1 | Date | input_kn8u23ie9sy |
Good to know about Form element names:
- You can edit the form element name attributed by default to each field. So you are completely free to rename it to suit your needs. Example: if instead of writing “input_kn8u23ie9sy” in cell B1, you prefer writing “email” to make it clearer, you need to rename the form element name of your field, and replace “input_kn8u23ie9sy” by “email”.
- Form element names are case sensitive. Their case must match between the Widget Studio and your Google Sheet.
You need to reiterate this process for each field of your form.
To deep dive our use case, it means that:
- in column C, we will add the form element name of the selectbox that is displayed below the email
- in column D, we will add the form element name of the second selectbox that can be displayed depending on the option chosen by the user in previous selectbox
- in column E, we will add the form element name of the toggle for the Terms & conditions.
You are done with the first row of your Google sheet? Great! Every time a user will submit your form, it will add a row in your Google Sheet with the corresponding values.
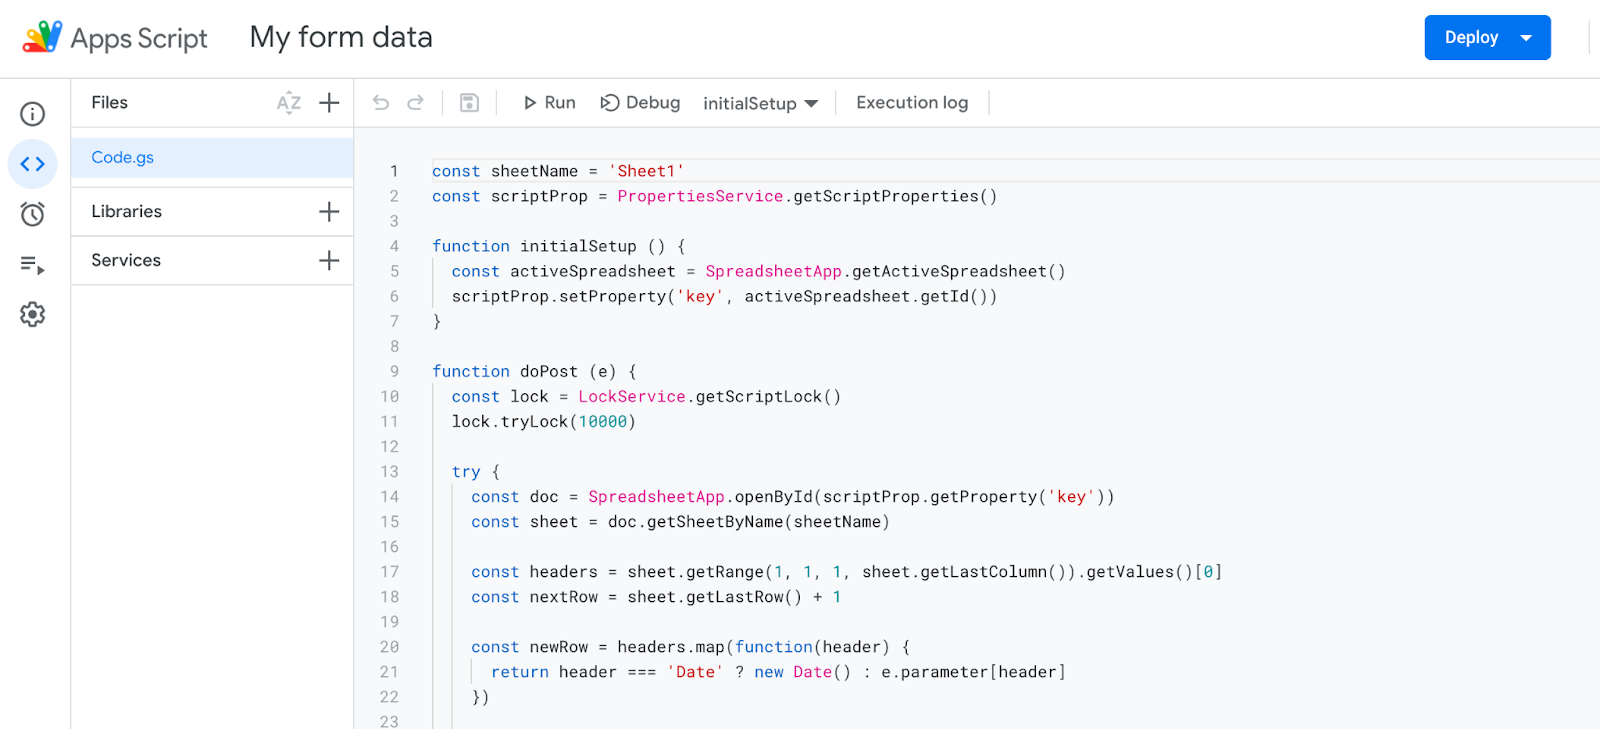
- Add a Google App Script
- Click on Extensions > Apps Script. This will open a new Google Script. Rename it (for example “My form data”).
- Replace all the content in the right side by the following code.
const sheetName = 'Sheet1'
  const scriptProp = PropertiesService.getScriptProperties()
  function initialSetup () {
    const activeSpreadsheet = SpreadsheetApp.getActiveSpreadsheet()
    scriptProp.setProperty('key', activeSpreadsheet.getId())
  }
  function doPost (e) {
    const lock = LockService.getScriptLock()
    lock.tryLock(10000)
  try {
      const doc = SpreadsheetApp.openById(scriptProp.getProperty('key'))
      const sheet = doc.getSheetByName(sheetName)
  const headers = sheet.getRange(1, 1, 1, sheet.getLastColumn()).getValues()[0]
  const nextRow = sheet.getLastRow() + 1
  const newRow = headers.map(function(header) {
  return header === 'Date' ? new Date() : e.parameter[header]})
   sheet.getRange(nextRow, 1, 1, newRow.length).setValues([newRow])
   return ContentService   .createTextOutput(JSON.stringify({ 'result': 'success', 'row': nextRow }))   .setMimeType(ContentService.MimeType.JSON)
  }
  catch (e) {
      return ContentService
        .createTextOutput(JSON.stringify({ 'result': 'error', 'error': e }))
        .setMimeType(ContentService.MimeType.JSON)
    }
  finally {
      lock.releaseLock()
    }
  }
Note: If for any reason, you can’t name your tab “Sheet1” as previously mentioned, you should change the first line of the script, and replace ‘Sheet1’ by the name of your tab.
When done, it should look like on the image below.
- Click on the Save project icon (at the left of the Run action)
- In the dropdown at the right of Debug action, select initialSetup (it should be selected by default)
- Click on Run action
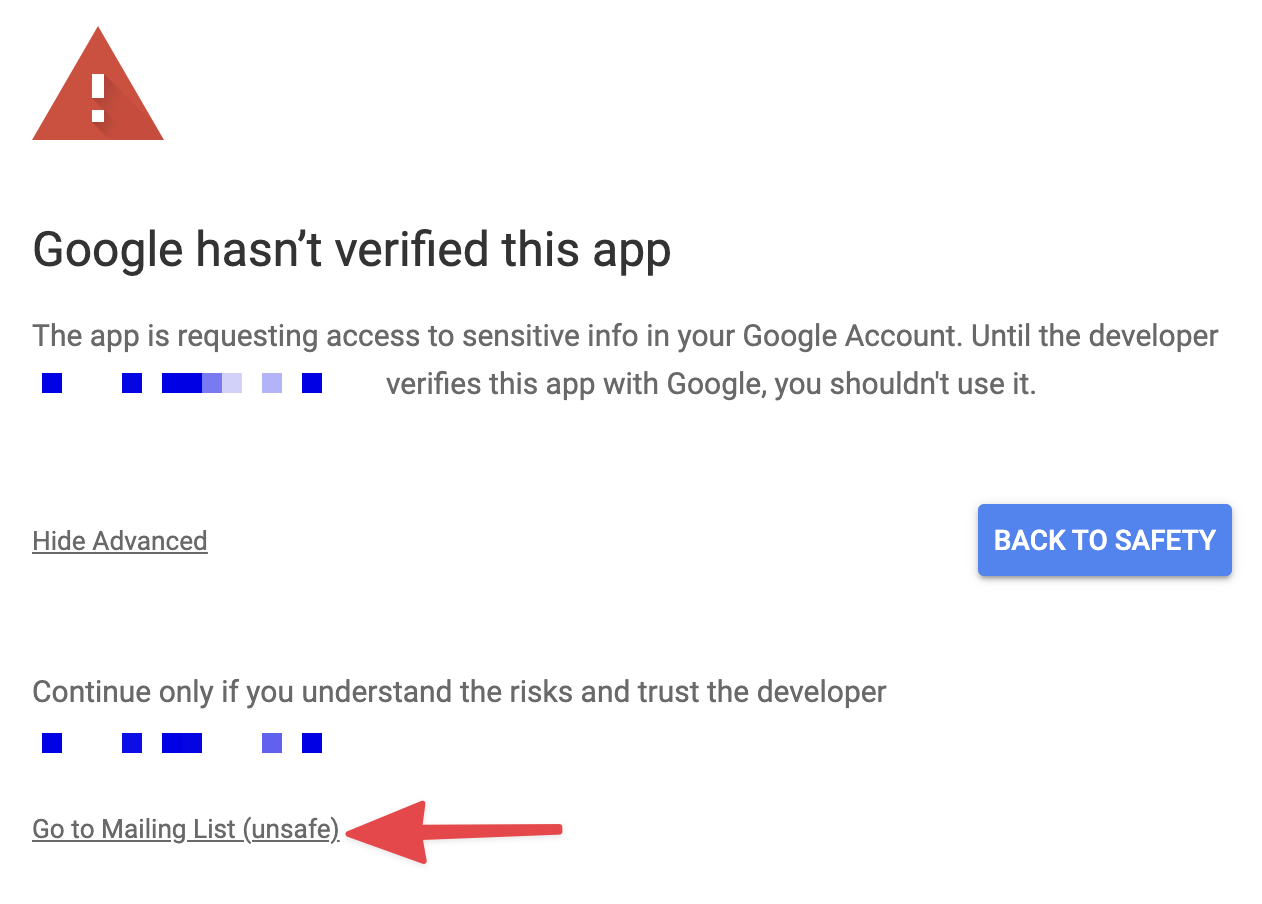
You might see a modal asking for permissions. Click Review permissions and continue to the next screen.
Because this script has not been reviewed by Google, it can generate a warning message before you can continue. Click the Go to Mailing List (Unsafe) for the script to have the correct permissions to update your form.
Once correct permissions are given to the script, you should see the following output in the script editor console:

In the left menu, click on the Triggers section (clock icon), to add a trigger for the script
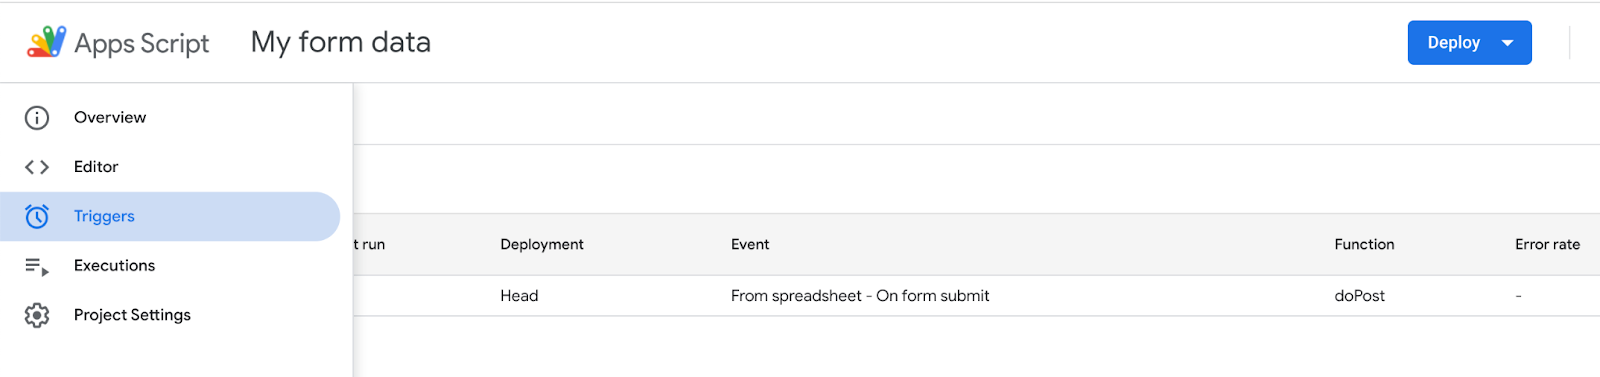
Then, click on the Add trigger button (in the bottom right corner).
In the window that appears, select the following options:
- Choose which function to run:
doPost - Choose which deployment should run:
Head - Select event source:
From spreadsheet - Select event type:
On form submit

Click on Save.
Select the Deploy button and New Deployment from the drop-down.

Click the Select type icon and select Web app.
In the form that appears, select the following options:
- Description:
My Form Data(This can be anything that you want. Just make it descriptive.) - Web app → Execute As:
Me - Web app → Who has access:
Anyone - Then click Deploy.
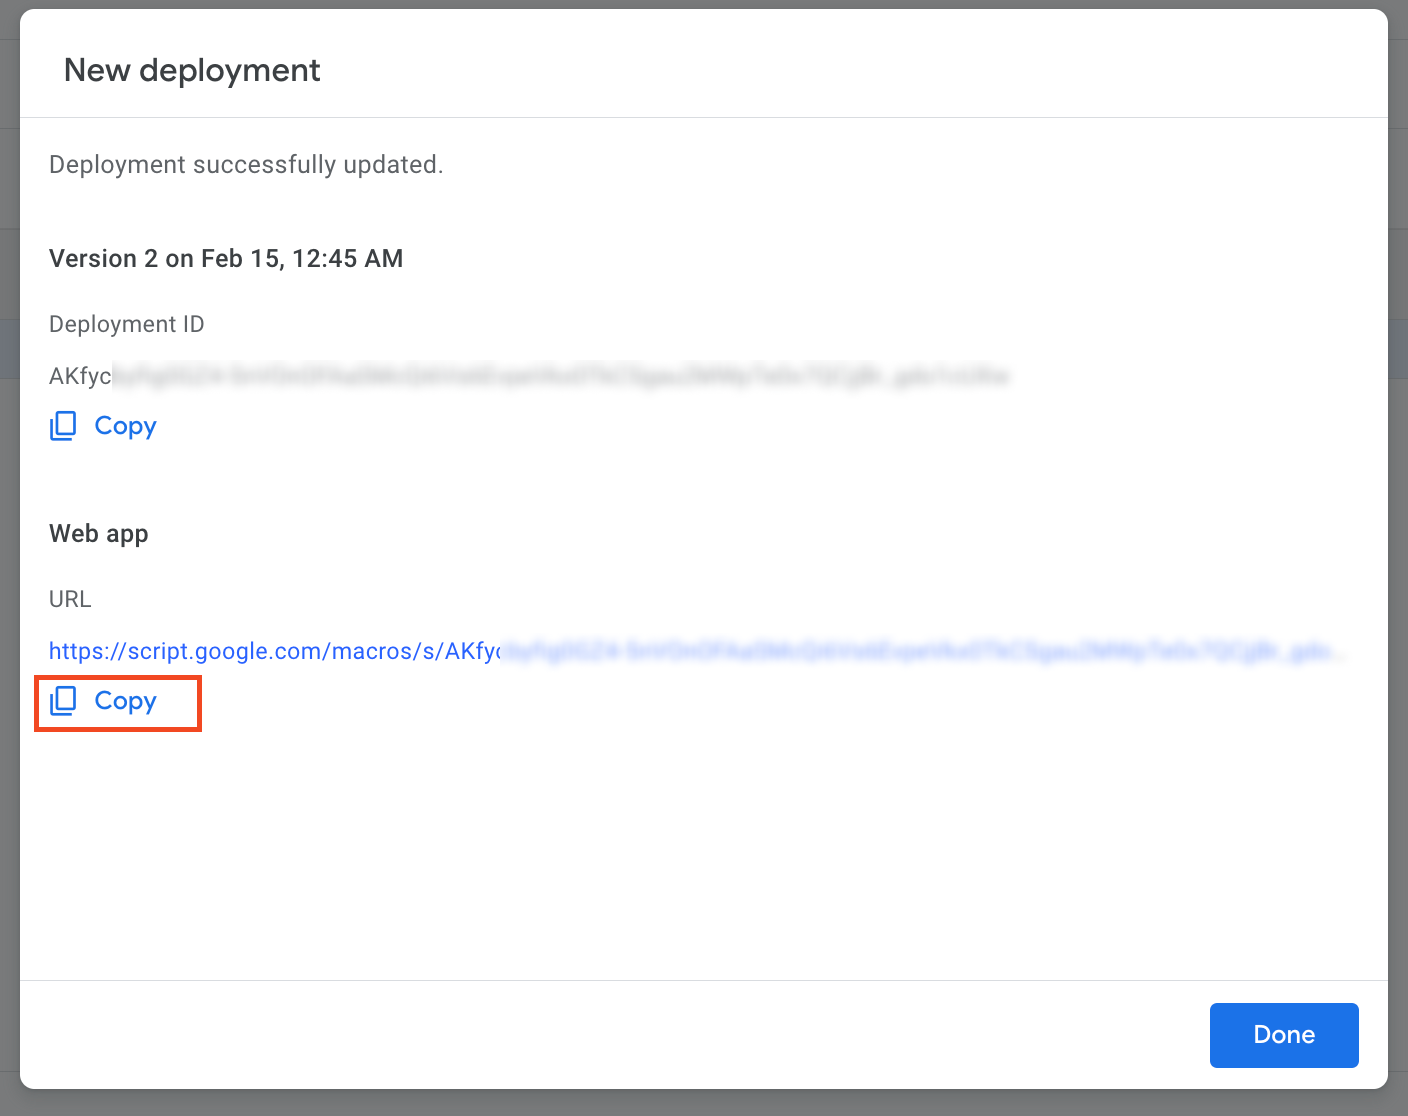
Copy the URL (click on the action circled in red on the image)
You have set up the most complicated part! All you have to do now is configure the Events section in the Widget Studio and you’re done.
Set up the Events section on the Widget Studio
- On the Widget Studio, click on the Events part, in the left menu (in second to last position)
- Click on Add event and choose Mouse

- Then select On element clicked and click on the name of your submit button. It will add a new line on the Events page.
- On this new line, now click on Add action > Request > Send data to

- A new pop-in opens.
- Attribute a name to this action in Request Name (for example: “Send data to my Google Sheet”). This name will be useful if you want to display a specific screen to your users, depending on the success or the failure of this request (read the following article about this topic)
- Select Method POST
- In Action URL, paste the URL that you have just copied in your Google Sheet
- In Form ID, select the name of the form whose data you want to send to your Google Sheet (most of the time, select the unique form you have added to your widget).
Once you have selected your form, a summary of all the fields sent to your Google Sheet will appear below. Make sure that data sent is correct, and that the form element name corresponds to the name of the different columns of the first row of your Google Sheet.
- Click on Select
- When you are done, Save your widget (click on the Save or Update button in the top right corner, depending on the status of your widget).
Your form data is now ready to be sent to your Google Sheet!
To test it, link your widget to a campaign (A/B Test or Personalization), run your campaign, fill out your form, submit it and a new row will appear in your Google Sheet with your responses.
