
Access the Widgets Dashboard
To access the Widgets Dashboard from the App, use the left side menu > Configure > Widgets.

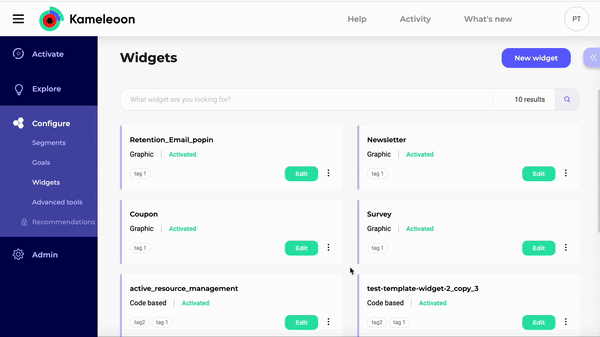
Structure of the Widgets Dashboard

- Header: button to create a new widget
- Search bar: search tool; number of created widgets
- Cards: information on the widgets; status; Edit button; three-dot menu (on the right) to apply actions to a widget
- Sidebar: filters; sorting tools; secondary actions linked to the three-dot menu
Widget information
Each widget is represented by a card that indicates the main information.
Want to know more about a widget? Mouse over the tooltip displayed to the right of the widget name and you’ll have access to a plethora of detailed information without needing to open our Widget Studio.
Find a widget
If you have created a large number of widgets, a search bar, a filtering tool and a sorting tool allow you to easily find a particular widget.
Filter

You can filter your widgets according to several criteria:
- Widget type
- Status
- Tag
Select one or several filter(s) and click on Apply.
Note: Once you apply filters, Kameleoon generates a unique URL with custom parameters, which you can then share with other members of your team. Just click on Copy link to this filtered dashboard located on the right of the dashboard title.

Sort

The sorting option allows you to sort your widgets according to their date of last modification or from most recent to oldest.
Select one type of sorting and click on Apply.
Edit a widget
You can edit your widget by clicking on the green Edit button.

Depending on the type of your widget, you will be redirected to the interface in which it was created.
Actions on a widget
Click on the 3 dots located to the right of each card to access a wide range of actions. The available actions depend on the status of your widget (activated/deactivated).

When your changes are complete, click on Validate to save them.
Rename
You can rename an existing widget.
The Rename sidebar opens. To validate the renaming of the widget, click on the Save button.
You can manage the tags associated to a widget.
The Manage tags sidebar opens. Tags associated to your widget are highlighted in the list and on the widget card. You can associate other tags and create new ones before associating them. To validate your choices, click on the Save button.
Duplicate
You can duplicate an existing widget. This saves you time if you want to create several similar widgets.
The Duplicate sidebar opens. To validate the creation of the new widget, click on the Save button. You will be able to find it in the Dashboard.
View code
You can view the code of a widget.
In the sidebar that opens, you can change the device(s) and the position on the page. By clicking again on View code, you can navigate between the JS and CSS tabs, copy the code and even expand the window.
Activate / Deactivate
You will need to activate a widget to be able to use it in your campaigns.
The status of a widget is indicated on its card: white = Activated / grey = Deactivated.


You can change this status through the 3 points menu.
Warning: If you deactivate a widget, you will no longer be able to use it in your campaigns.
Delete
You can delete an existing widget.
To validate the deletion of the widget, confirm your choice in the popin.
