Segment destination actions
This feature is currently in open beta and is not yet visible in the Segment Destination Catalog. Please contact the Kameleoon support team to learn more about implementing Segment destination actions in your web or mobile app.
With this Segment x Kameleoon integration, every event triggered by Segment is automatically sent to Kameleoon, saving developers time from re-implementing an existing Segment tracking plan in Kameleoon.
If the Segment event name matches the name of an existing goal in your Kameleoon account, a conversion for this goal will be associated with the visitor. If the goal does not exist, Kameleoon will create a custom goal by using the Segment event name and associate the conversion with the visitor. The goal will appear in the Kameleoon goals page with the naming convention "Segment.io — eventName". Once the goal has been created, you can use them in any of your experiments or personalizations.
Import Segment events, traits, groups and personas into Kameleoon
With this Segment x Kameleoon integration:
- Every event that is triggered by Segment will be automatically sent to Kameleoon, saving developers time from re-implementing an existing Segment Tracking plan in Kameleoon. Page, Screen, and Track events are automatically collected as a Kameleoon custom goal. You can use any of them in your experiments/personalizations, or to target users performing a specific action on your website or mobile app.
- Track events of type Audience Entered or Audience exited are collected as a Kameleoon custom data to be used in our Segment builder to target user personas.
- Track events of type identify with traits are collected as Kameleoon custom data to be used in our Segment builder to target users with specific traits.
- Track events of type group are collected as Kameleoon custom data to be used in our Segment builder to target a group ID.
Considerations
Keep these things in mind when sending events to Kameleoon:
- You must enable this integration in each Segment project you want to use it in.
- You need a paid Kameleoon plan to enable this integration.
- You need to match your Segment users with Kameleoon visitors using the same system of identifiers for both tools.
- This integration has technical limitations.
- Segment sends all user, event, and group properties along with the event.
Limitations
Relevant limits for Kameleoon events are:
- 1 MB maximum size of event data
- Can't create more than 50 Kameleoon goals over a 10 seconds period
- Can't create more than 1000 Kameleoon goals over a 60 minutes period
Setup
Prerequisites
To configure an Event Streaming integration from Segment to Kameleoon, you need the following information from Kameleoon:
- REST API Key: To start sending data to Kameleoon, you need your API Key. See the Generate your API Key section for more help.
- Sitecode: You must provide the Sitecode for the project you want to use with this integration. See the dedicated Kameleoon documentation to know where you can find your Sitecode.
Kameleoon setup
Ensure you have your API Key and your Sitecode, so you can set up your integration from Segment.
Generate your API Key
To generate your API Key:
- Get your client ID and client secret. You can find them in your profile page.
- Use your client ID and secret with the following URL to generate your API Key:
https://integrations.kameleoon.com/segmentio/getapikey?id=**[CLIENT ID]**&secret=**[CLIENT SECRET]**
Get your Sitecode
You can find your project's Sitecode on the project dashboard. See the dedicated Kameleoon documentation to know where you can find your Sitecode.
Segment setup
- In the Segment web app, click Catalog > Destinations > Destinations Actions > Add destination.
- Select the Source you want to connect to Kameleoon (Actions).
- Click Confirm Source.
-
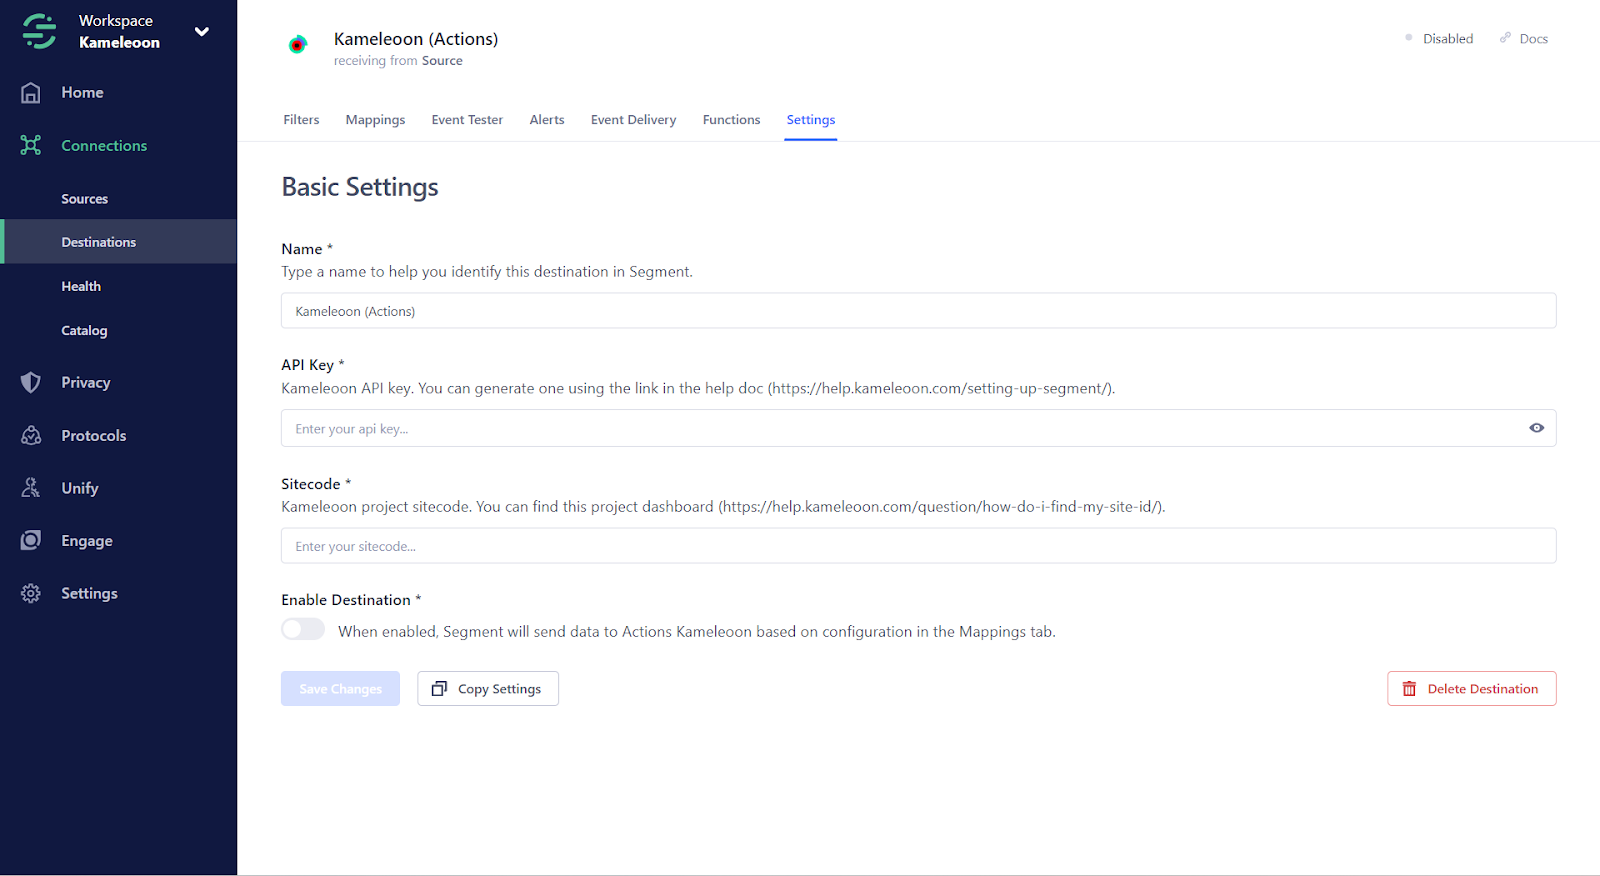
In the Basic Settings side panel, fill in the required fields:
- Name: Enter a name to help you identify this destination in Segment.
- API Key: Paste your Kameleoon API key.
- Sitecode: Paste your Kameleoon project sitecode. You can find it in the project dashboard.
-
Click the Enable Destination toggle.
-
Click Save Changes.
Matching a Segment user with a Kameleoon visitor
The integration requires that you use the same system of identifiers for both tools. While Segment uses the userId, Kameleoon uses the kameleoonVisitorCode. To identify which visitor triggered the forwarded Segment events, you must include the kameleoonVisitorCode in your Segment events.
If you use Kameleoon Web Experiments on your project, Kameleoon places a cookie that contains an anonymous unique identifier called the Kameleoon Visitor Code, which is randomly assigned to a visitor. This ID is used to uniquely identify a visitor.
To retrieve the kameleoonVisitorCode from the browser cookies, use the following code:
// Retrieve kameleoonVisitorCode - client-side cookies
 const parseCookie = (str) =>
     str
         .split(";")
         .map((v) => v.split("="))
         .reduce((acc, v) => {
             acc[decodeURIComponent(v[0].trim())] = decodeURIComponent(v[1].trim());
             return acc;
         }, {});
 const {kameleoonVisitorCode} = parseCookie(document.cookie);
To add the kameleoonVisitorCode to all your Segment events, you can add the following middleware code to your website:
analytics.addSourceMiddleware(({ payload, next, integrations }) => {
     const event = payload.obj;
     const kamVC = Kameleoon.API.Visitor.code;
     switch (event.type) {
       case "track":
          payload.obj.properties.kameleoonVisitorCode = kamVC;
          break;
       case "page":
         payload.obj.properties.kameleoonVisitorCode = kamVC;
         break;
       case "identify":
         payload.obj.traits.kameleoonVisitorCode = kamVC;
         break;
     }
     next();
   });
If your project is a mobile application, you can do the same middleware by using the associated Segment library:
If your project is a server-side project, you can create a middleware by using the Plugin Architecture:
You may choose to use the EventPlugin, which lets you redefine how event functions behave. Alternatively, you can opt for the DestinationPlugin, which operates similarly to the EventPlugin, but is tailored to a specific destination.
Here's an example of a C# Plugin:
class KameleoonEnrichment : Plugin
{
    public override PluginType Type => PluginType.Enrichment;
    public override RawEvent Execute(RawEvent incomingEvent)
    {
        incomingEvent.Context["kameleoonVisitorCode"] = "PUT THE VISITOR CODE HERE";
        return incomingEvent;
    }
}
If your website is using Kameleoon Web Experimentation, you can add the following code to your global custom script:
const addVisitorCodeToEventsPayload = ({ payload, next, integrations }) => {
     payload.obj.properties.kameleoonVisitorCode = window.Kameleoon.API.Visitor.code;
     next(payload);
 };
 Kameleoon.API.Core.runWhenConditionTrue(
     () => typeof window.analytics?.addSourceMiddleware === "function",
     () => analytics.addSourceMiddleware(addVisitorCodeToEventsPayload),
     100
 );
To know more about uploading events to Segment, we recommend reading the dedicated documentation page.
Retrieving automatically created goals
As mentioned before, Kameleoon will create a custom goal using the Segment event name and associate the conversion to the visitor. The name of the created goals will start with "SegmentIO" followed by the event type and event name.
Example: If the event name is "Clicked on Checkout," the generated goal will be named "SegmentIO track - Clicked on Checkout."
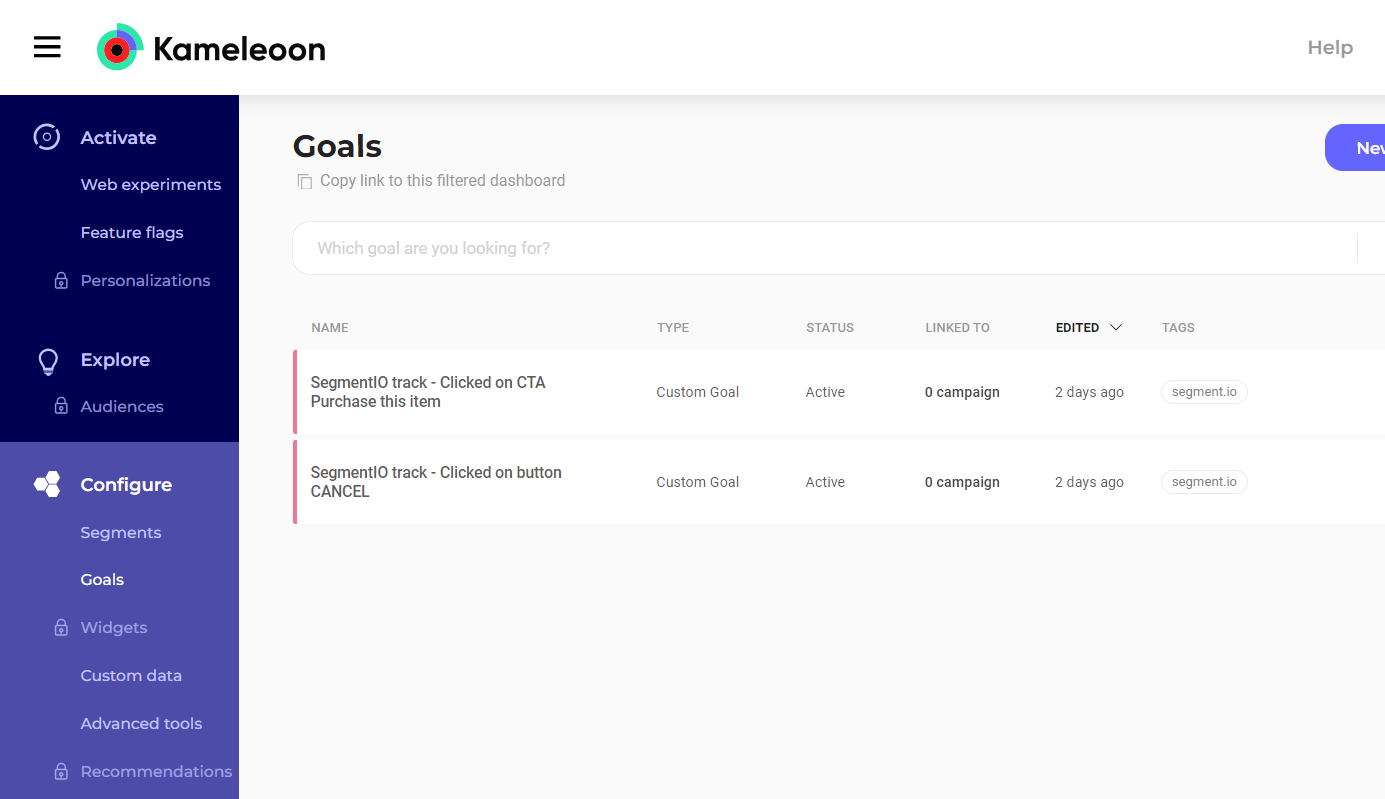
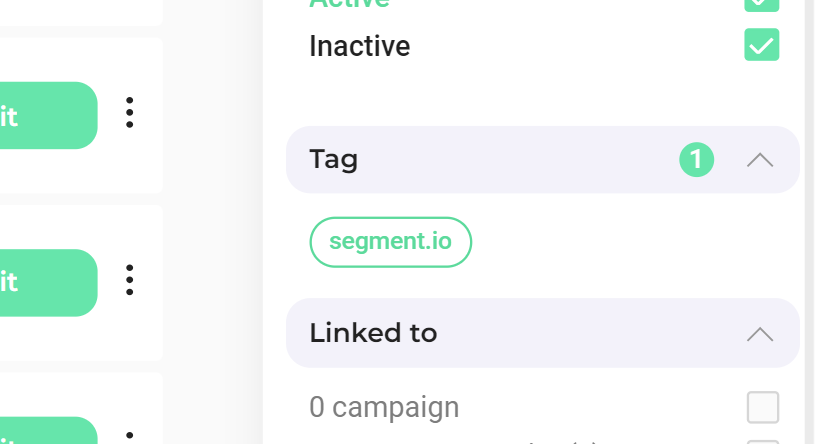
Additionally, automatically created goals will have the tag "segment.io" attached to them.
To find these automatically created goals, go to the goal dashboard and search for goals that have the "segment.io" tag using the tag filter in the side panel.
Renaming or deleting automatically created goals
When receiving an event from Segment, Kameleoon will search for the existing associated goal by looking for a matching goal name (considering the naming convention). If you change the goal name, Kameleoon will not find it. Kameleoon will create a new goal with a name matching the Segment.io event name (and the previous goal conversions will still be attached to the previous goal).
Therefore, if you want to change a goal name, we recommend changing the Segment event name, too, to match the new goal name.
We also recommend changing the goal name if you decide to rename a Segment event to match the new event name.
If you decide to delete a goal, Kameleoon will not find it. Kameleoon will create a new goal with a name matching the Segment. event name. Because it's a new goal, all goal conversions will be lost.
Automatic goal conversion
Now that a goal has been generated, Kameleoon will start associating the conversions with the goal. As mentioned before, if the Segment event name matches the name of an existing goal in your Kameleoon account, a conversion for this goal is associated with the visitor.
In the Goals dashboard, if you click on a Segment goal's Edit button, you will see the following pop-up:

Don't pay attention to the displayed message: "To trigger a custom goal conversion, you can either use our JavaScript Activation API or the SDK corresponding to your backend server language (example for NodeJS)".
Since the events received by Kameleoon will automatically trigger a goal conversion, you don't need to implement any frontend or backend code to trigger a Segment goal. The goal will be automatically converted if the associated Segment event is triggered and forwarded to Kameleoon.
Benefiting from Segment Destination Actions features
The Destination Actions framework improves on classic destinations by letting you see and control how Segment sends the event data it receives from your sources to actions-based destinations. Each Action in a destination lists the event data it requires and the event data that is optional.
Features
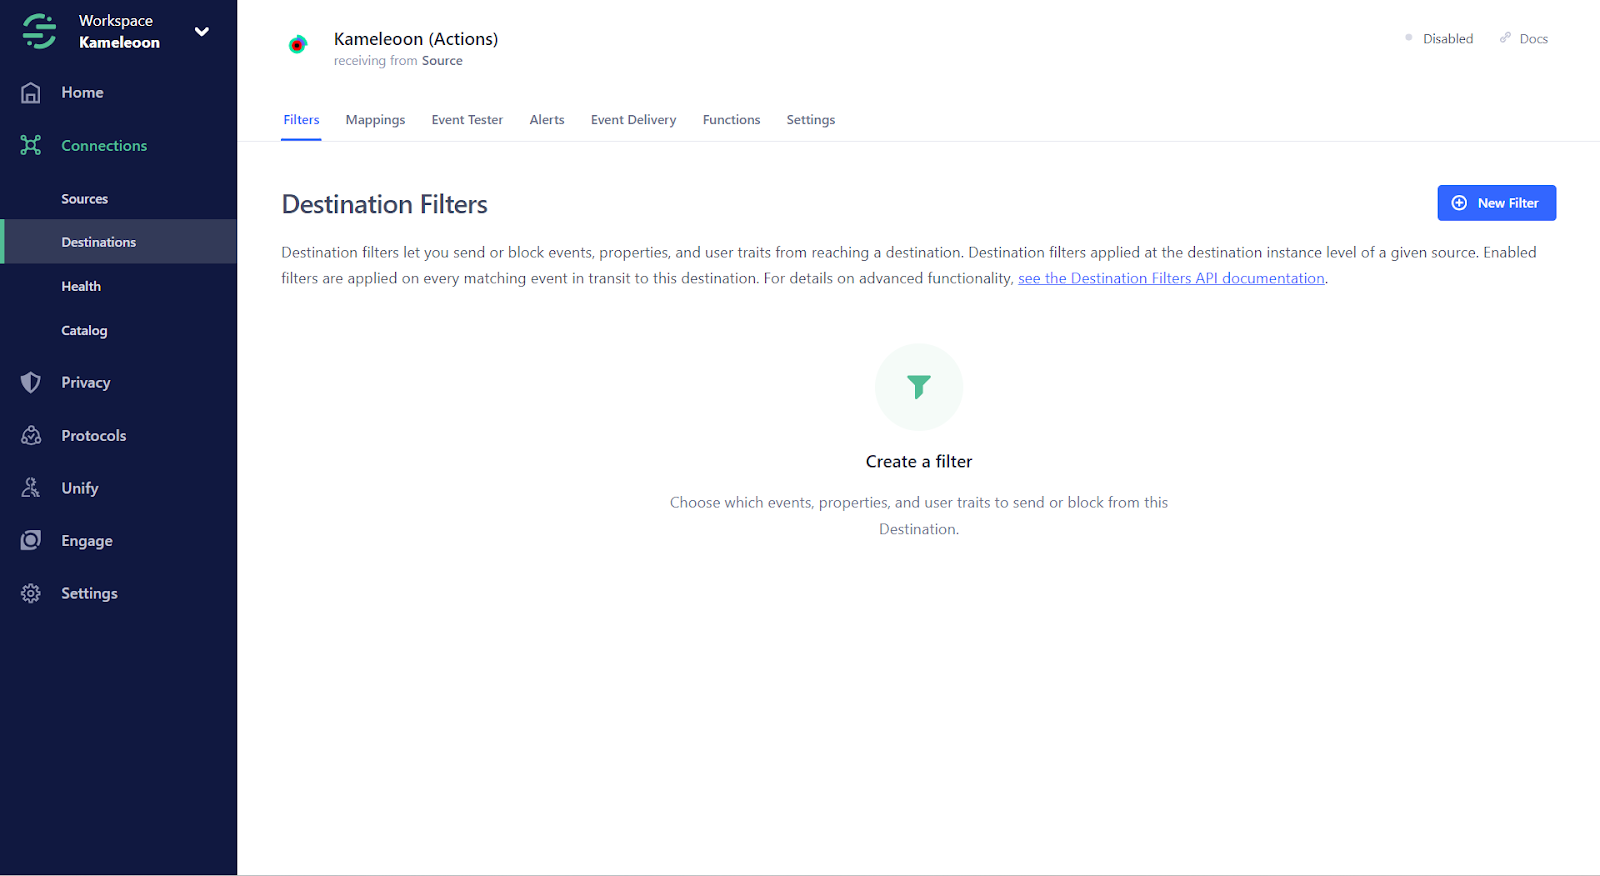
- Filters: Destination filters let you send or block events, properties, and user traits from reaching a destination. Destination filters are applied at the destination instance level of a given source. Enabled filters are applied on every matching event in transit to this destination. For details on advanced functionality, see the Destination Filters API documentation.
- Mappings: Configure the data mapping from your source to the destination (Kameleoon).
- Event tester: To ensure your events are delivered to their destination, generate an event payload and send a test event. Visit Documentation.
- Alerts: Subscribe to alerts when this destination's delivery rate dips below a certain threshold within a 24 hour period.
- Event delivery: The Event Delivery tool helps you understand if data is reaching your destinations and see if Segment encountered any issues delivering your source data. See the dedicated documentation
- Functions: Use insert functions to perform custom transformations on event payloads before sending them to a connected destination. To use an existing insert function, connect one to this destination from the catalog.
Migration from the classic Kameleoon destination
To migrate from the classic Kameleoon destination, you can follow these three steps:
Visitor Identification
- Include the
kameleoonVisitorCodein your Segment events for accurate visitor tracking.
Mapping, Filters, and Testing
- Define Mapping and Filters in the destination configuration page.
- Test events to ensure accurate goal creation and conversion tracking.
Activation
- Activate the Kameleoon (Actions) destination when everything is tested and ready.
- Deactivate the classic Kameleoon destination.
Personas, traits and group
Kameleoon lets you target users based on their Segment persona: a group who have specific property traits.
To use personas, traits, and group IDs in our Segment builder, you must set up a custom data in your Kameleoon account for the project of your choice.
Personas
You can choose the custom data's name (for example, SegmentIO personas). The custom data must be of type List of string.
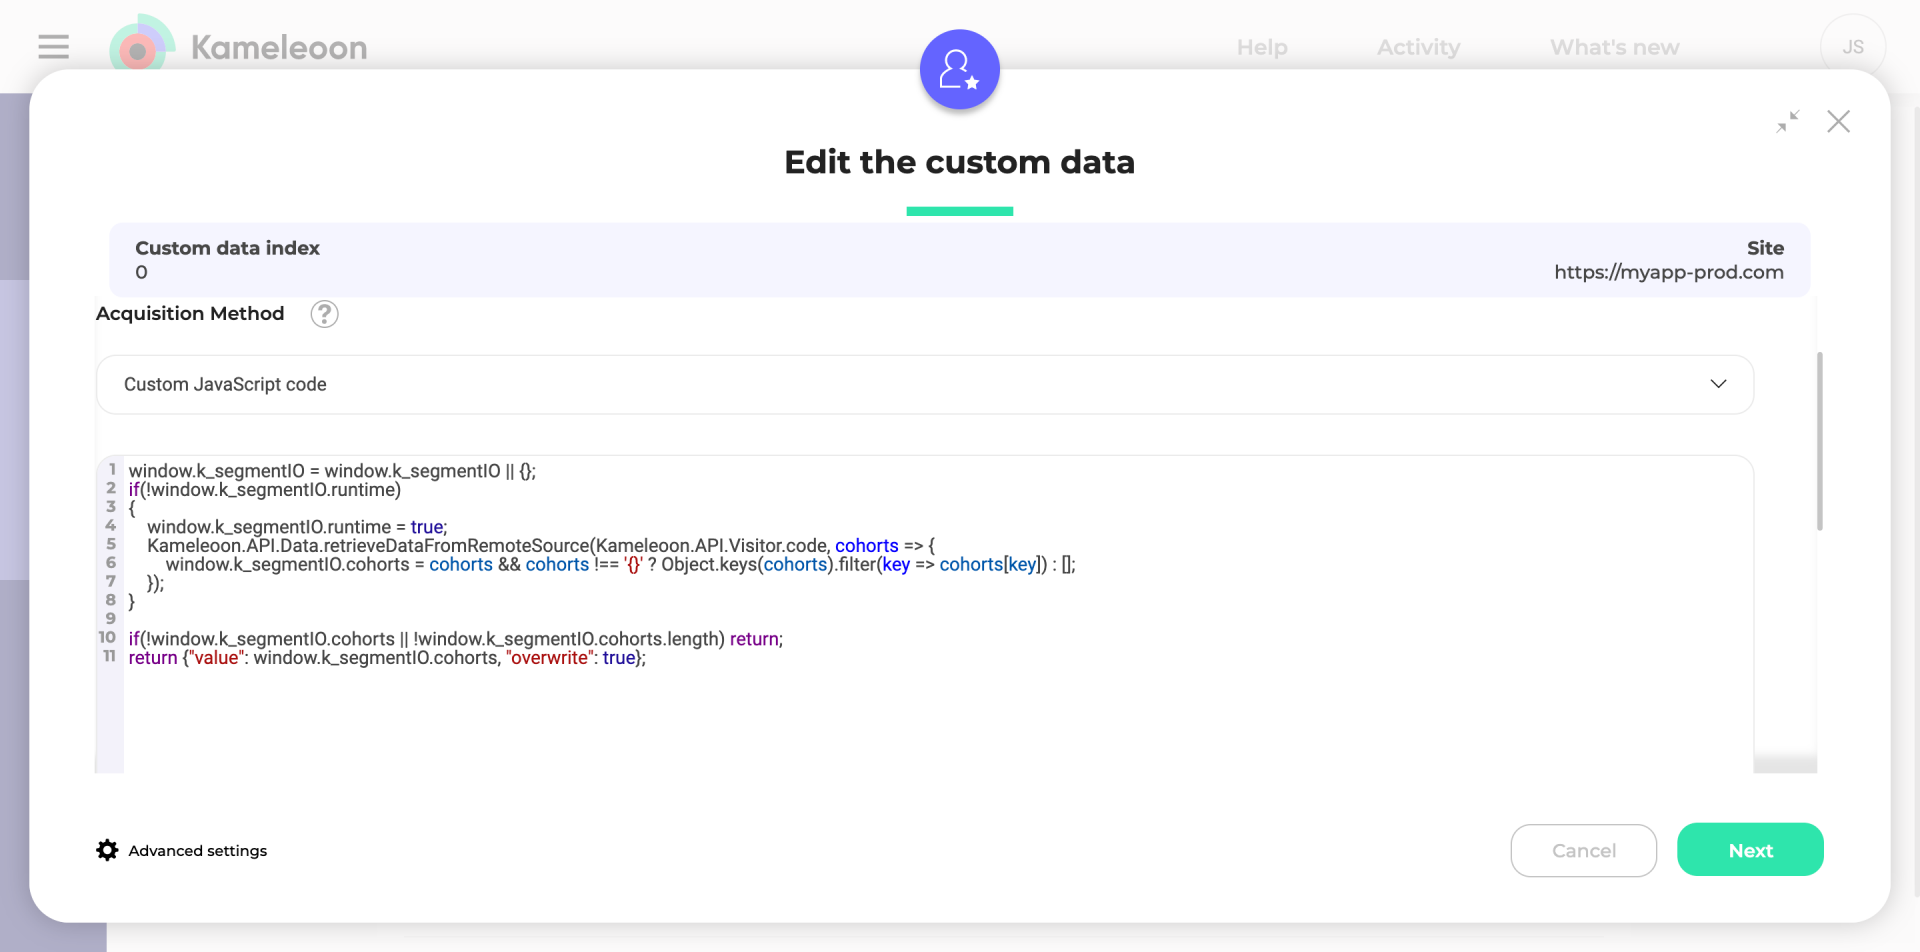
Please follow the guidelines below for Web Experimentation only.
You can use the code below in the custom data acquisition method:
window.k_segmentIO = window.k_segmentIO || {};
 if(!window.k_segmentIO.runtime)
 {
     window.k_segmentIO.runtime = true;
Depending on your setup, you'll need to determine the appropriate logic for obtaining the user ID.
If you've been using a track event call to send our visitor code, use the following line:
const user_id = Kameleoon.API.Visitor.code;
Alternatively, if you use our Visitor Code as the Segment user ID or need to retrieve the user ID from Segment's analytics object, use the following line:
const user_id = window.analytics.user().id() || window.analytics.user().anonymousId();

`Kameleoon.API.Data.retrieveDataFromRemoteSource(`COHORTS_${user_id}`, cohorts => {     window.k_segmentIO.cohorts = cohorts && cohorts !== '{}' ? Object.keys(cohorts).filter(key => cohorts[key]) : []; });``
 }
 if(!window.k_segmentIO.cohorts || !window.k_segmentIO.cohorts.length) return;
 return {"value": window.k_segmentIO.cohorts, "overwrite": true};
To use Segment personas in server-side experiments or feature flags, you can consult the guidelines outlined in each SDK's documentation.
Our SDKs employ the getRemoteData() method. This method fetches data stored by Segment in our servers and make it accessible in your backend code.
The "key" value to use as the first parameter should follow this format: IDENTIFY{user_id}.
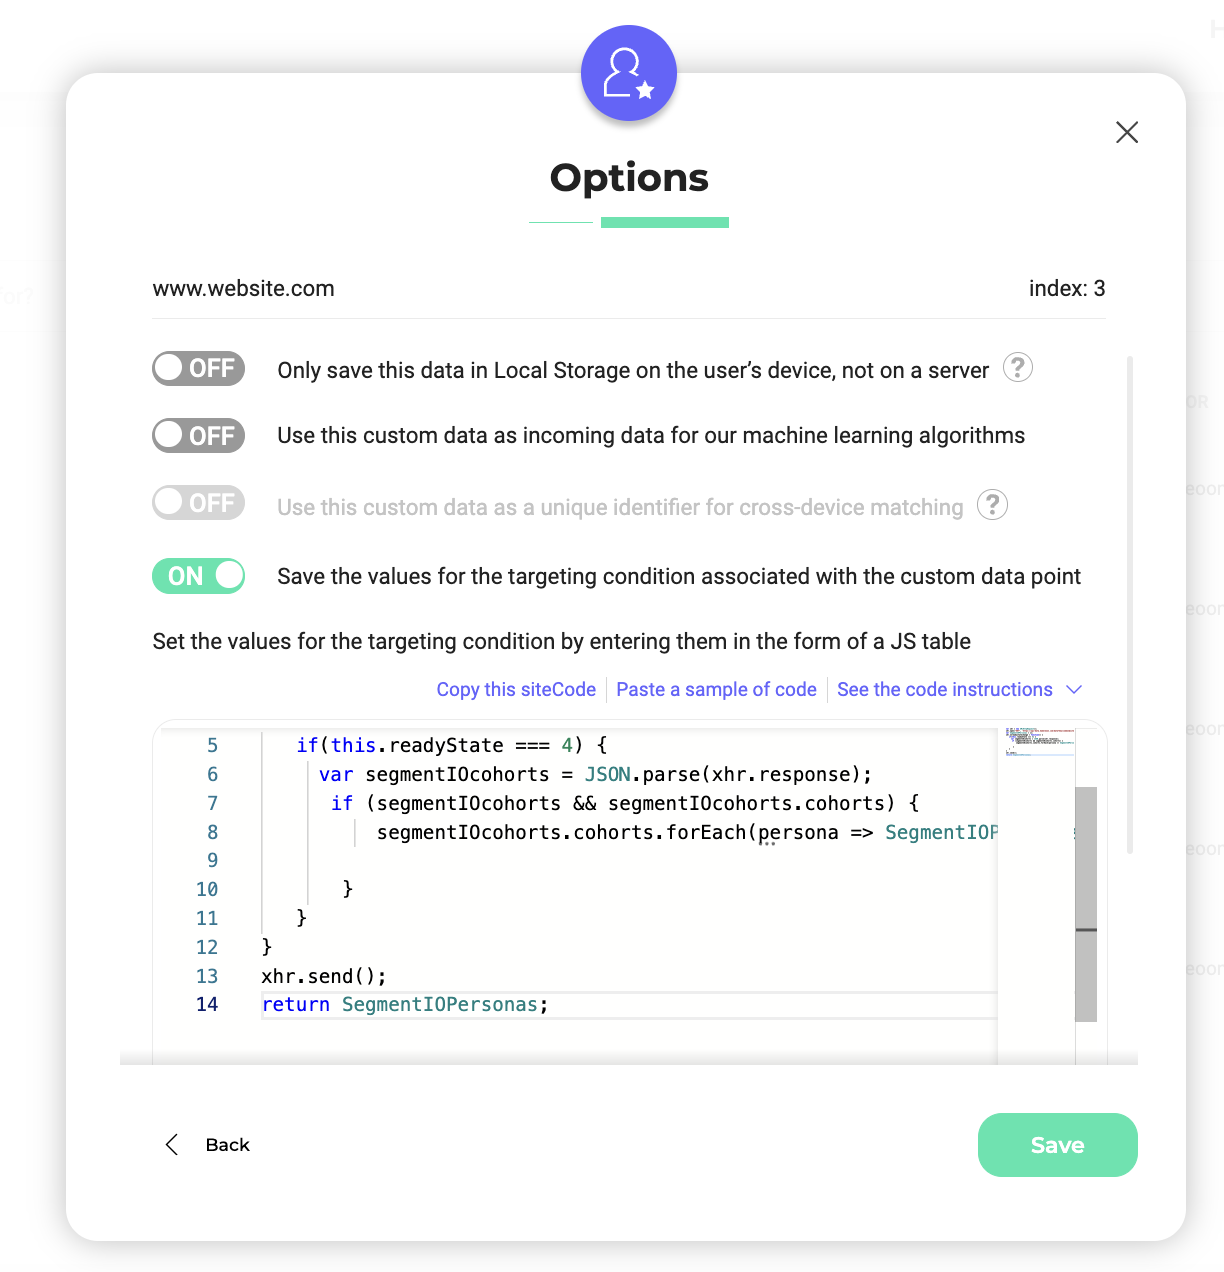
Fetch Segment Persona names in Kameleoon
Click Next and activate the Save the values for the targeting condition associated with the custom data point option. Add the JS code below and replace XXXXXXXXX with the Kameleoon Sitecode. To find the Sitecode, please follow this documentation.
var xhr = new XMLHttpRequest();
xhr.open("GET", '[https://api-data.kameleoon.com/data?key=common&siteCode=XXXXXXXXX](https://api-data.kameleoon.com/data?key=common&siteCode=XXXXXXXXX)', false);
var SegmentIOPersonas = [];
xhr.onreadystatechange = function() {
   if(this.readyState === 4) {
     var segmentIOcohorts = JSON.parse(xhr.response);
	  if (segmentIOcohorts && segmentIOcohorts.cohorts) {
		  segmentIOcohorts.cohorts.forEach(persona => SegmentIOPersonas.push({value: persona, label: persona}) );

	   }
   }
}
xhr.send();
return SegmentIOPersonas;
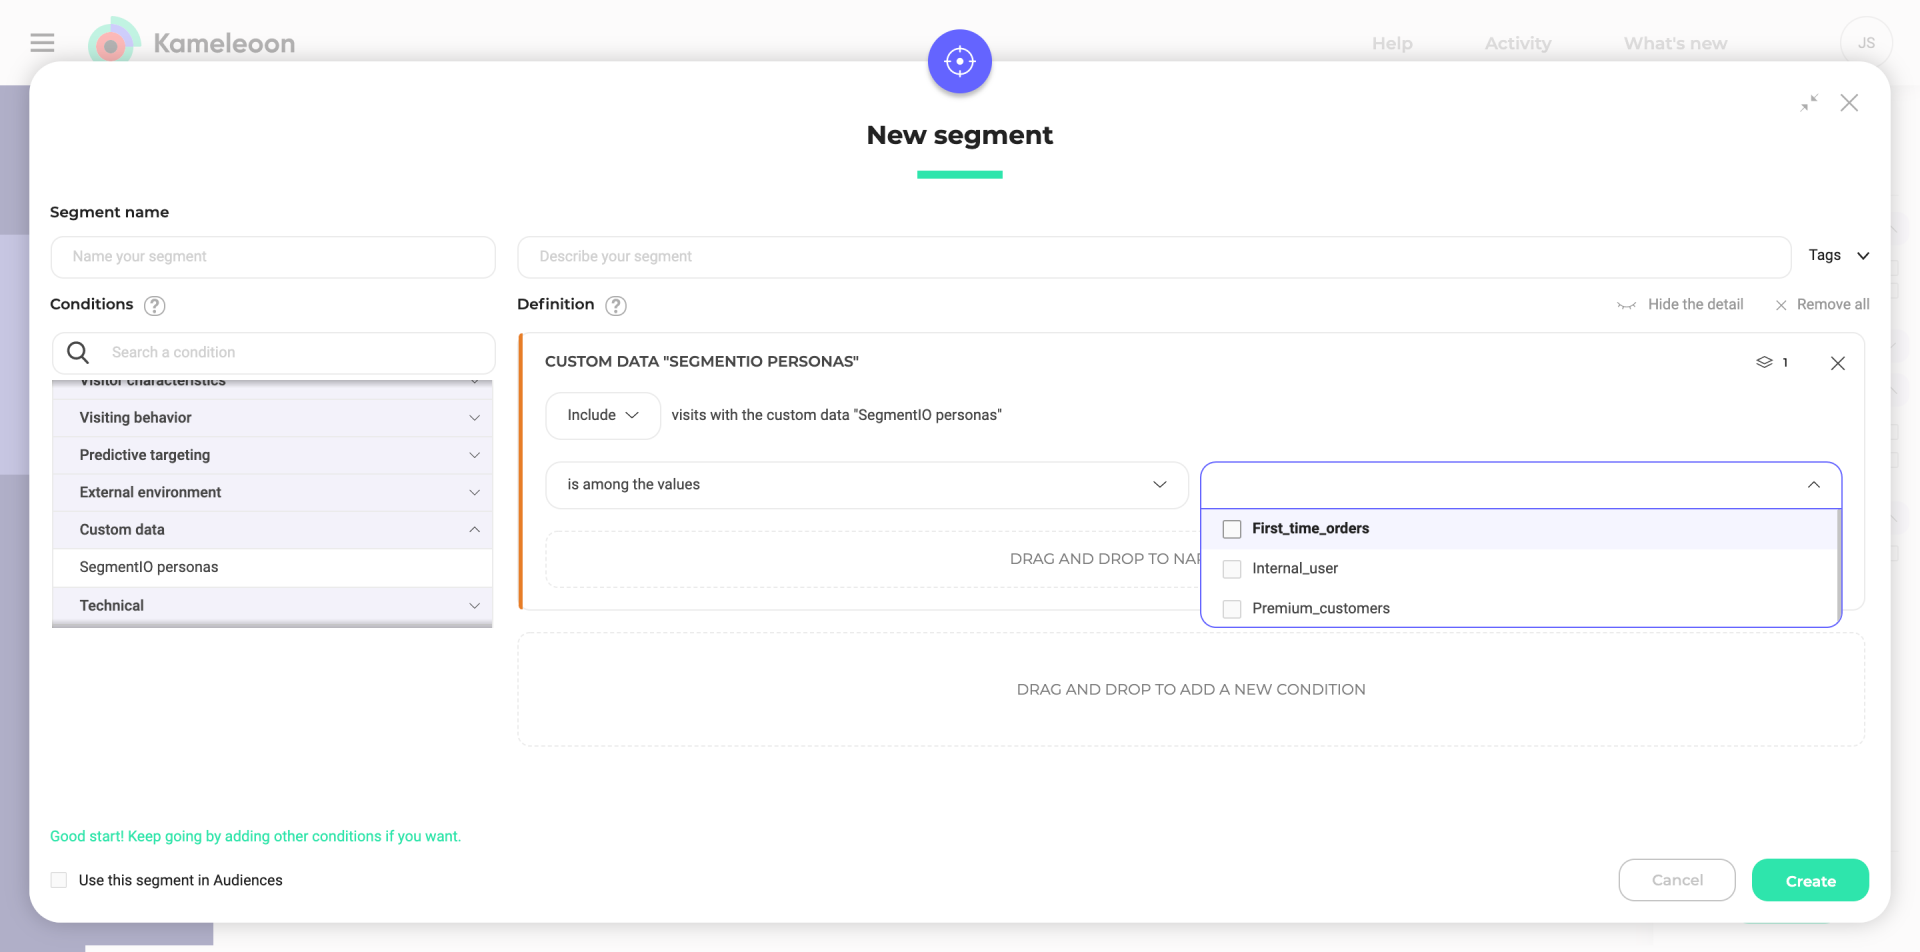
Click Validate to create the Custom Data.
That's it! You can now use Segment Personas in our Segment Builder. The list of available personas is shown when you choose the operator is among the values.
Traits
To use traits in our segment builder to target your campaigns, you must create one custom data per trait type. Let's say you want to target users based on the plan they have subscribed to on your website. Your website has three different plans: freemium, scale and enterprise. You must set up a custom data called "Subscribed Plan" and the custom data must be of type "string".
Please follow the guidelines below for Web Experimentation only.
You can use the code below in the custom data acquisition method:
window.k_segmentIO = window.k_segmentIO || {};
 if(!window.k_segmentIO.runtime)
 {
     window.k_segmentIO.runtime = true;
Depending on your setup, you'll need to determine the appropriate logic for obtaining the user ID.
If you've been using a track event call to send our visitor code, use the following line:
const user_id = Kameleoon.API.Visitor.code;
Alternatively, if you use our Visitor Code as the Segment user ID or need to retrieve the user ID from Segment's analytics object, use the following code:
const user_id = window.analytics.user().id() || window.analytics.user().anonymousId();

  Kameleoon.API.Data.retrieveDataFromRemoteSource(`IDENTIFY_${user_id}`, segment_identify_properties => {
         if(segment_identify_properties && segment_identify_properties.traits && segment_identify_properties.traits.plan){
             window.k_segmentIO.plan = segment_identify_properties.traits.plan;
         }
     });
 }
 if(!window.k_segmentIO.plan) return;
 return {"value": window.k_segmentIO.plan, "overwrite": true};
To use Segment personas in server-side experiments or feature flags, you can consult the guidelines outlined in each SDK's documentation.
Our SDKs employ the getRemoteData() method. This method fetches data stored by Segment in our servers and make it accessible in your backend code.
The "key" value to use as the first parameter should follow this format: IDENTIFY{user_id}.
You can follow the same guidelines for every trait property you want to use in the segment builder of Kameleoon.
Group IDs
To use group IDs in our segment builder to target your campaigns, you must set up a custom data called "Group ID," and the custom data must be of type string.
Please follow the guidelines below for Web Experimentation only.
You can use the code below in the custom data acquisition method:
window.k_segmentIO = window.k_segmentIO || {};
 if(!window.k_segmentIO.runtime)
 {
     window.k_segmentIO.runtime = true;
Depending on your setup, you'll need to determine the appropriate logic for obtaining the user ID.
If you've been using a track event call to send our visitor code, use the following line:
const user_id = Kameleoon.API.Visitor.code;
Alternatively, if you use our Visitor Code as the Segment user ID or need to retrieve the user ID from Segment's analytics object, use the following line:
const user_id = window.analytics.user().id() || window.analytics.user().anonymousId();

   Kameleoon.API.Data.retrieveDataFromRemoteSource(`IDENTIFY_${user_id}`, segment_identify_properties => {
         if(segment_identify_properties && segment_identify_properties.groupId){
             window.k_segmentIO.groupId = segment_identify_properties.groupId;
         }
     });
 }
 if(!window.k_segmentIO.groupId) return;
 return {"value": window.k_segmentIO.groupId, "overwrite": true};
To use Segment personas in server-side experiments or feature flags, you can consult the guidelines outlined in each SDK's documentation.
Our SDKs employ the getRemoteData() method. This method fetches data stored by Segment in our servers and make it accessible in your backend code.
The "key" value to use as the first parameter should follow this format: IDENTIFY{user_id}.