Set up and launch a personalization
Use this guide to configure and launch a personalization campaign in the Personalization builder.
Access the Personalization builder
To create a new personalization:
- Log in to the Kameleoon app.
- Go to Experiences > Personalization.
- Click New personalization.
Step 1: Add content
In the first step, define the content you want to display to your visitors.

- Click Add content.
- Select one of the following methods to create your content.
- Using prompt: Opens the prompt-based experimentation (PBX) interface. You can design your content using AI-driven prompts. Learn more about using PBX.
- With the graphic editor: Opens the Graphic editor. You can design your content visually directly on your website. Learn more about the Graphic editor
- With the code editor: Opens the Code editor. You can design your content using HTML, CSS, and JavaScript. Learn more about the Code editor.
- From an existing experiment: Duplicate content from an existing experiment. After you import the content, it remains independent of the original experiment. You can edit the content within the Personalization builder without affecting the original version. Similarly, any updates you make to the original experiment do not affect your personalization.
- If you select this option:
- Select the desired experiment from the list.
- Choose the content you want to use (cannot be the experiment's Control version).
- Click Select.
- If you select this option:
Manage content
Once you add content, it appears in your content list. Kameleoon displays the source beneath the name (for example, Created from PBX).

- Edit: Click the pencil icon to reopen the editor associated with that content.
- Options: Click the three dots menu to Rename, Preview, Duplicate, or Delete the content.
Step 2: Define targeting rules
Targeting rules determine who sees your personalization, where they see it, and when it appears. You can configure multiple targeting rules for a single personalization and define automatic rollback conditions.
How Kameleoon evaluates targeting rules
Kameleoon evaluates targeting rules sequentially in the order they appear. A visitor sees only one rule per personalization evaluation. The first rule that satisfies both the targeting conditions and exposure eligibility determines the content the visitor sees.
For each targeting rule, Kameleoon follows this process:
- Evaluate targeting conditions: The system verifies if the visitor meets the criteria defined in segments and triggers. If the visitor does not meet the conditions, the system ignores the rule and proceeds to the next one.
- Evaluate exposure eligibility: If the visitor meets the targeting conditions, the system checks if they qualify for exposure based on traffic allocation, display settings (capping), and scenarios.
- Determine exposure:
- If the visitor qualifies for exposure, they see the assigned content. Kameleoon stops the evaluation process and does not check any subsequent rules.
- If the visitor does not qualify for exposure, the system proceeds to the next targeting rule.
If Kameleoon evaluates all targeting rules and none result in exposure, the personalization does not display any content.
To change the order of your targeting rules, click and drag the left side of a rule card.
To configure targeting, click the Targeting rules tab. Kameleoon automatically creates a default rule. Click the text field under Rule name to rename the rule.
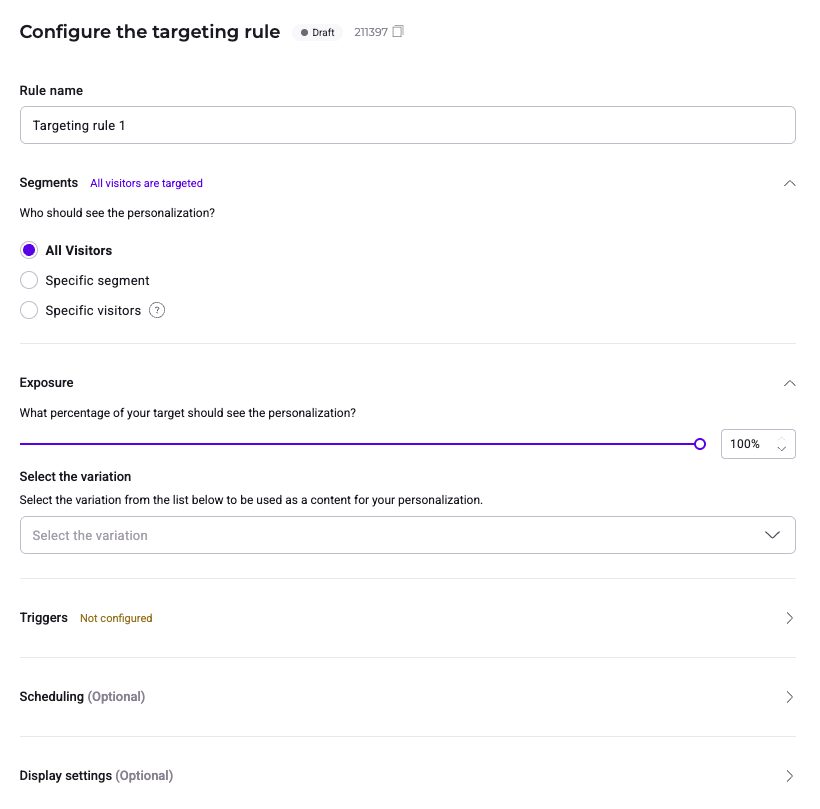
Segments
Define which segments of visitors are eligible for this rule.
- All visitors: Targets every visitor on your site.
- Specific segment: Select an existing segment from the dropdown or click Create a new segment.
- Specific visitors: Define targeting conditions for specific visitors without having to create a segment.
- Select a condition from the dropdown.
- Click Add a condition to include more criteria.
- Use the logic dropdown to select If any (OR logic) or If all (AND logic).
- Click the reset icon to clear all conditions.
Exposure and content
- Exposure: Use the slider or enter a number in the text field to define the percentage of your target audience that sees the personalization.
- Select the content: Use the dropdown to choose which specific content (created in Step 1) displays for this rule.
Triggers
Expand the Triggers section to define when the personalization activates.
- Reach a webpage:
- A specific page: Triggers on a specific URL.
- The URLs containing a specific fragment: Triggers on URLs containing a defined string (for example,
/checkout). - The entire site: Triggers on all pages within the project scope. Use this option with caution.
- When a specific trigger occurs: Select an existing trigger or click Create a new trigger.
- When a combination of triggers occurs: Quickly combine multiple triggers without creating a segment using If any (OR) or If all (AND) logic.
Scheduling (Optional)
Expand the Scheduling section to set a time frame for your personalization.
- Click + Add a schedule.
- Set a Start on date and an End on date.
Display settings (Optional)
Expand Display settings to control frequency and capping.
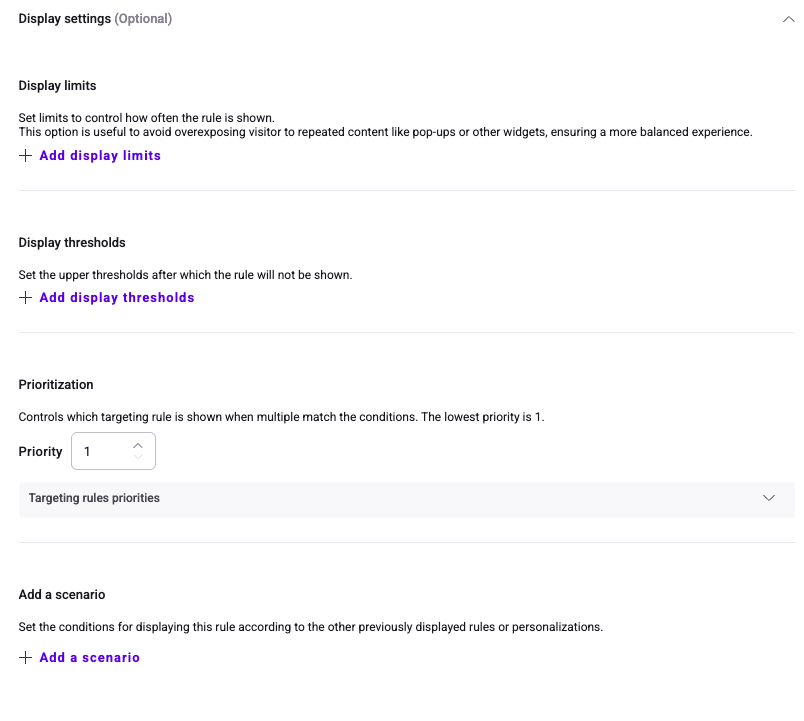
Display limits
Click Add display limits to restrict exposure frequency:
- During the same visit: Limit the maximum number of displays per session.
- For the same visitor: Limit displays to a specific number over a set period (hours, weeks, or months).
- Consecutive displays: Enforce a time gap (seconds, minutes, hours, or days) between two displays.
Display thresholds
Define when the rule should stop running completely. You can pause the rule based on:
- Total number of exposed visitors.
- Number of visitors who complete (or fail to complete) a goal.
- A set number of visits, displays, or conversions for a specific visitor.
Prioritization
If a visitor matches multiple rules, prioritization determines which one applies. Set a numeric value under Prioritization (1 is the lowest priority).
Scenarios
Scenarios allow you to orchestrate how your personalizations interact with one another. While targeting rules decide who sees a personalization, scenarios decide if they should see it based on their exposure to other personalizations or rules.
Use scenarios to prevent marketing fatigue and create sequential user journeys.
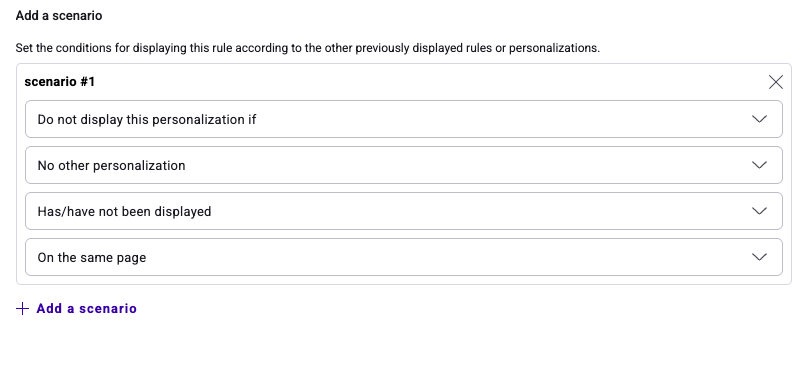
- Click Add a scenario.
- Configure the logic using the dropdowns.
- Action: Choose whether to Display or not display this personalization based on the criteria below.
- Quantity (Scope): Define how many other personalizations affect this rule (for example, No other, At least one other, or All other personalizations).
- State: Define the required state for other personalizations (Displayed or Not displayed).
- Timeframe: Define when the interaction with other personalizations occurred (for example, On the same page, During the current visit, or During a previous visit).
Example configuration: To prevent a user from seeing this personalization if they have already seen any other personalization in the current visit, you would configure:
- Do not display this personalization if the visitor saw at least one other personalization during the current visit.
Rollback conditions
Kameleoon can automatically pause a personalization rule if it performs poorly against a specific goal.
To set up a rollback condition:
- Create a new rule or select an existing one.
- Click Rollback conditions at the bottom of the rule configuration pane to expand the menu.
- Click Add a condition and fill in the following fields:
- Performance indicator: Select Conversion rate. For personalizations, you can only select this indicator.
- Condition: Choose higher than or lower than and enter the threshold percentage that triggers the automatic rollback (for example, Conversion rate lower than 60%).
- Goal: Select the goal to monitor from the dropdown menu.
- Minimum visitors: Enter the minimum number of visitors who must see the personalization before the rollback occurs.
- (Optional) Check the checkbox to send an email alert if a rollback occurs.
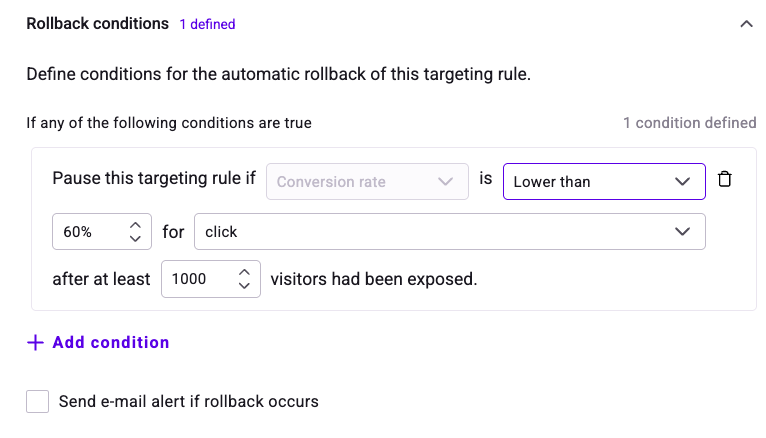
Kameleoon continuously monitors the specified metrics against your conditions. You can add multiple conditions. If you define multiple conditions, the rollback is triggered as soon as one condition is met, without waiting for the others.
Step 3: Configure reporting
Track your personalization results by configuring goals, integrations, or both, depending on your reporting needs.
Goals
To track conversions directly in Kameleoon:
- Navigate to the Goals menu.
- Select the goal you want to track to measure personalization success.
- If the desired goal does not exist, click Create a new goal. Learn more about goals.
Integrations
If you use third-party analytics or reporting tools:
- Click Integrations.
- Select the tools where you want to send personalization data.
Step 4: Configure general settings (Optional)
The General settings menu provides global configurations for the personalization.
Main information
- Simulation URL: Change the default URL Kameleoon uses when you simulate the personalization.
- Tags: Add tags to organize your personalizations.
- Description: Add internal notes about the personalization.
Personalization custom script
Add specific JavaScript code here. This script executes:
- Alongside the global script.
- Before the personalization code.
- Independently of targeting conditions.
Advanced settings
Configure a custom Attribution window. This defines the period (in days and hours) during which Kameleoon attributes a visitor's conversions and revenues to this specific personalization.
Launch
Once configured:
- Click Save to save your work.
- Click Simulate to preview the personalization behavior in your browser.
- When ready, launch the personalization. You can launch one or several targeting rules together by clicking Launch in the header, or you can launch individual rules by clicking the launch button within a specific rule.