Target your imported audiences
Data warehouse integrations are available as a premium add-on for our Web Experimentation and Feature Experimentation module. For more information, please contact your Customer Success Manager.
We currently support Data warehouse integrations from the following providers:
- BigQuery
- Snowflake
- Redshift
- Databricks
Support for the following provider is coming soon:
- Microsoft Azure
For more information, and if you want to be part of our early adopter program, please contact your Customer Success Manager.
Target your imported audiences in a Kameleoon experiment
This standard example shows the simplest method of targeting your imported audiences in a Kameleoon experiment. Let's say you have a user table in your warehouse, a sample of which looks like this:
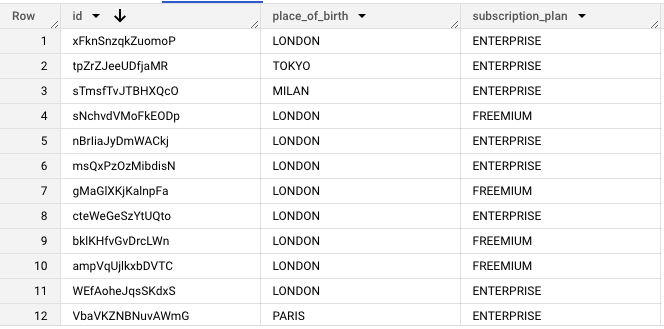
In this example, we want to target all users born in London. This audience requires an Ingestion Task that you can configure as described above. We'll name this Ingestion Task "The Londoners". The SQL query for this task will be:
SELECT id FROM user WHERE place_of_birth="LONDON"
To target the audience polled by this (and all other) Ingestion Tasks, you need to to go through the following setup.
Set up a Kameleoon Custom Data entry
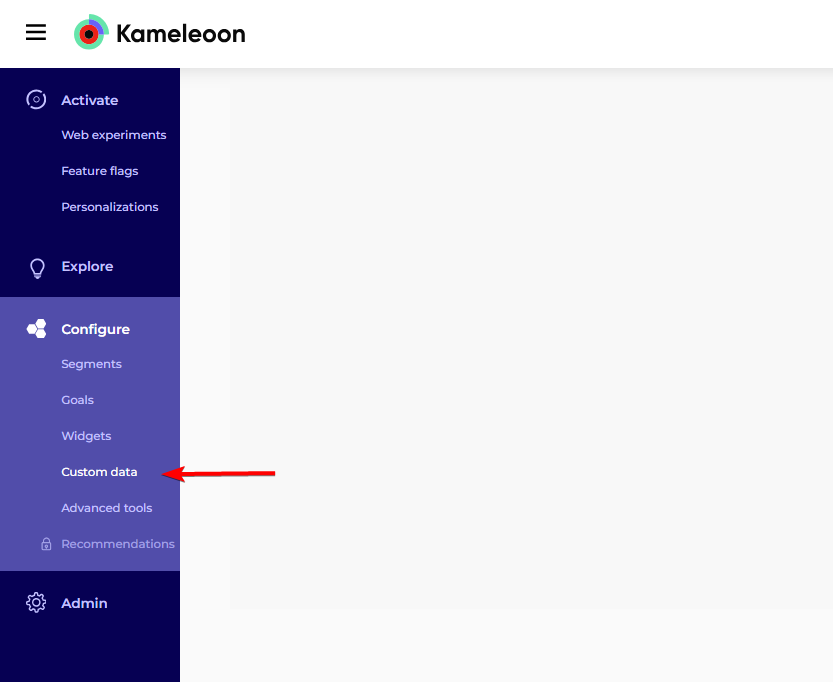
- In the left menu, click Configure > Custom data.
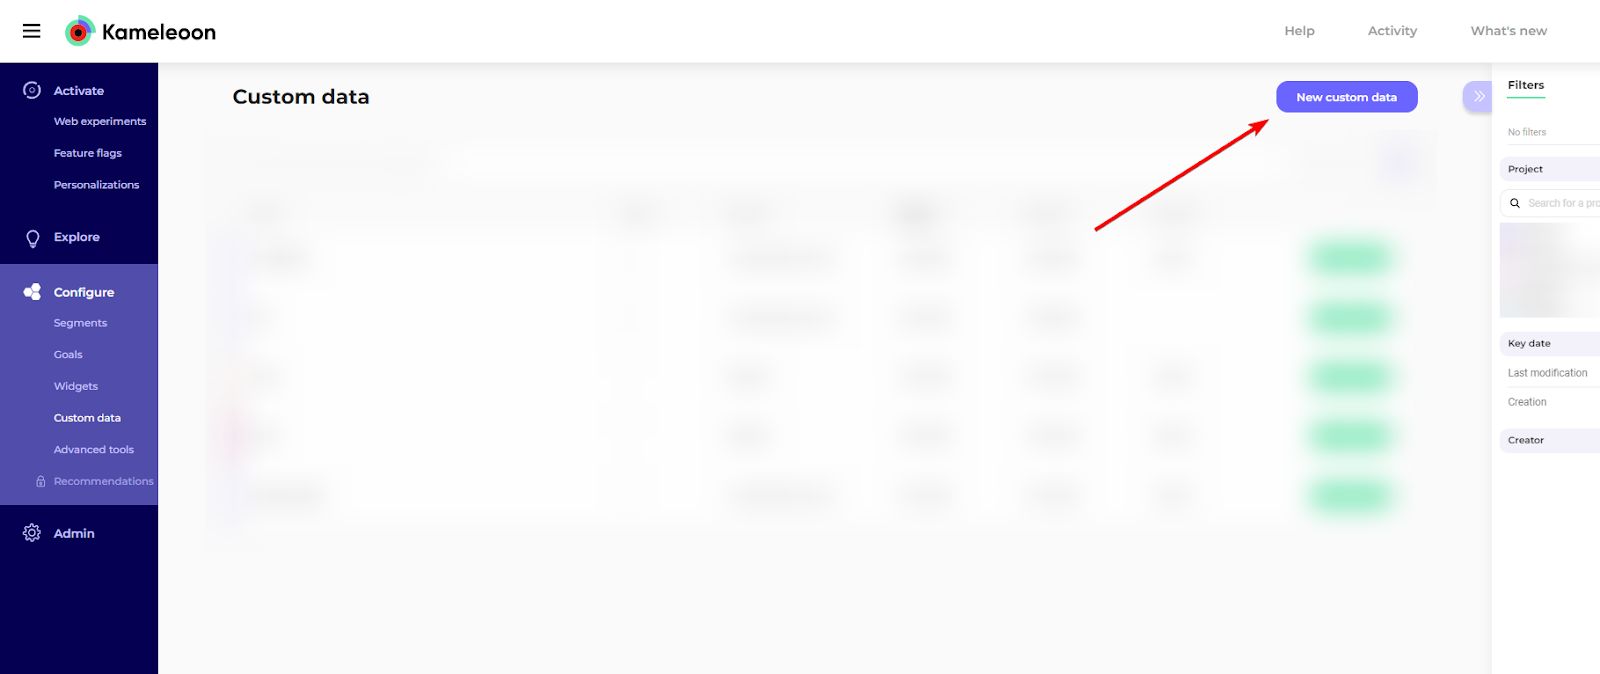
- Click New custom data.
- Provide a name for your custom data.
- Select the project on which you configured the Data Ingestion Task
- Choose the acquisition method Kameleoon SDK method or Custom JavaScript code.
- Please see the following section dedicated to this parameter here.
- Choose List for the type and String for the format.
- For the Scope, select Visit.
- Click Next.

- You can set the different values that will appear in the segment's targeting condition you create. Click Save the values for the targeting condition associated with the custom data point.
const sitecode= "YOUR_SITE_CODE"; //replace this value with your project's sitecode.
const xhr = new XMLHttpRequest();
 xhr.open('GET', `https://data.kameleoon.io/map/maps?siteCode=${sitecode}&keys=%5B%22warehouse%5Faudience%5Fconfig%22%5D`, false);
 xhr.send(null);
 if (xhr.status === 200) {
    const data = JSON.parse(xhr.responseText)
    if ("warehouse_audience_config" in data) {
       if ("audience_labels" in data["warehouse_audience_config"]) {
          return data["warehouse_audience_config"]["audience_labels"];
       }
    }
    return [];
 } else {
    console.error("Error calling for existing custom data values");
    return [];
 }
- Click Create.
Custom data acquisition
The custom data acquisition method specifies what code fills the custom data's value and where this code is executed. There are several acquisition possibilities according to your Kameleoon set up.
If you are using Feature Experimentation only, you can select the Kameleoon SDK method. When using this method, the acquisition code will execute at the points where you've included Kameleoon SDK methods. These Kameleoon methods fetch the warehouse audiences your visitor belongs to and then store that information in the Custom Data section. The precise code snippet depends on the SDK you are using. Here is an example written with our JavaScript SDK:
import { KameleoonClient, KameleoonUtils } from '@kameleoon/javascript-sdk';
 const client = new KameleoonClient('my_site_code');
 async function init() {
 await client.initialize();
 // -- Get visitor code
 const visitorCode = KameleoonUtils.getVisitorCode('www.example.com');
 // -- Get the warehouse visitor id
 warehouseVisitorId = anyClient.getThisVisitorId();
 // -- Index of your custom data
 const customDataIndex = 10;
 // -- Get visitor warehouse audience data using `warehouseKey`
 // and add it to storage
 const customData: CustomData = await getVisitorWarehouseAudience({
 visitorCode: 'my_visitor',
 customDataIndex: customDataIndex,
 warehouseKey: warehouseVisitorId,
 });
 }
 init();
Note that the warehouseVisitorId variable needs to be filled with the visitor ID that your organization uses for this visitor in their warehouse. This line of code depends on your organization's visitor identification system. If you don't have one, you can use the Kameleoon Visitor Code, but you also must use the Kameleoon Visitor Code in your warehouse.
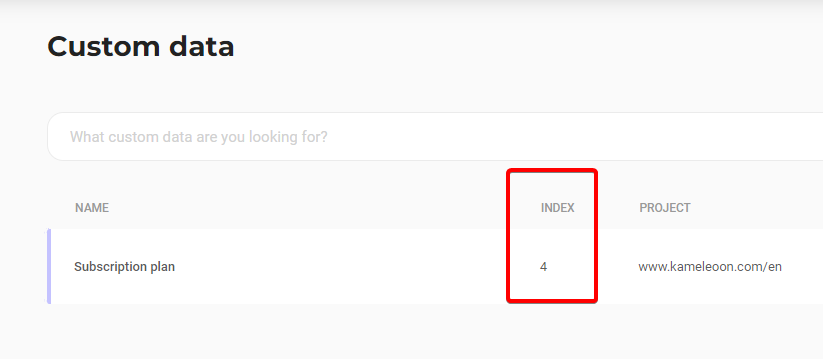
Replace the value of customDataIndex with your custom data's index. You can find the index on the dashboard:
If you are using Web Experimentation (or both Web Experimentation and Feature Experimentation), you can select Custom JavaScript code. In this case the code snippet will be run by the kameleoon.js file. You can either add the following snippet to your project global script (in Admin > Configure > then edit the appropriate project):
const warehouseVisitorId = anyClient.getThisVisitorId();
Kameleoon.API.Data.retrieveDataFromRemoteSource(warehouseVisitorId, function(data) {
     if("warehouseAudiences" in data){
         Kameleoon.API.Data.setCustomData("My Warehouse Audiences", Object.keys(data["warehouseAudiences"]));
 }
In this case, we need to use the name of your Custom Data and not the index, as in the previous SDK example.
Alternatively, you can enter the snippet below in the appropriate field when configuring the custom data:
const warehouseVisitorId = anyClient.getThisVisitorId();
 if (typeof window.kameleoon_configured_warehouse_audiences === 'undefined') {
    window.kameleoon_configured_warehouse_audiences = null;
    Kameleoon.API.Data.retrieveDataFromRemoteSource(warehouseVisitorId, function(data) {
      if ("warehouseAudiences" in data) {
        window.kameleoon_configured_warehouse_audiences = Object.keys(data["warehouseAudiences"]);
      }
    });
 }
 if (window.kameleoon_configured_warehouse_audiences === null) {
    return null;
 }
 return {"value": window.kameleoon_configured_warehouse_audiences};
This is a one time setup that will work for all of your Ingestion Tasks.
For example, let's say you have a second Ingestion Task that polls visitors born in March, and you call it "Born in March". The custom data's value for a visitor born in March and in London will contain both audiences ("The Londoners", "Born in March").
Thus, you can use this single custom data for all of your Kameleoon Segments that target your warehouse audiences. You can then use this custom data in your Kameleoon campaigns (experiments, feature experiments or personalizations) to target users based on their belonging to a specific audience in your warehouse.
To create such a segment, follow these steps:
- Create a segment as explained in the dedicated documentation.
- In your segment, use a custom data condition.
- When choosing the is among the values operator, you should see the list of Audiences associated with the Data Ingestion Tasks you created: The Londoners, Born in March, etc.
Targeting imported audiences by attributes
This section explains an alternate method to target audiences you've imported from your warehouse. This method is especially helpful if you want to run separate Experiments targeting different values of the same visitor attribute. We'll keep the same data and use case as in the previous example, only this time we want to target many different cities of origin and not just visitors born in London. This targeting would be possible with the setup previously described: you would create an Ingestion Task for each place of birth you wish to target. However this could be a bit tedious if you want to target 50 different cities.
Kameleoon lets you import attributes of the visitors in your warehouse audiences. Importing is achieved by adding extra fields to the SQL query after the visitor id field, like this:
SELECT id, place_of_birth FROM user
You can then create a Custom Data that will, this time, contain the value of the attribute place_of_birth. For JavaScript SDK implementation, the code looks like this:
import { KameleoonClient } from '@kameleoon/javascript-sdk';
const client = new KameleoonClient('my_site_code');
async function init() {
    await client.initialize();
    // -- Get the warehouse visitor id
    warehouseVisitorId = anyClient.getThisVisitorId();
    // -- Id of the ingestion task
    const taskId = your_task_id;
    // -- Name of the attribute
    const attributeName = "place_of_birth";
    // -- Get remote data
    const jsonData = await getRemoteData(warehouseVisitorId);
    const data = JSON.parse(jsonData);
    if ("warehouseAudiences" in data){
        if (taskId in data["warehouseAudiences"]){
            const city = data["warehouseAudiences"][taskId][attributeName];
             `// -- The index of the custom data you have created`
             const customDataIndex = your_index;
             const customData = new CustomData(customDataIndex, city);
             // -- Add custom data
             client.addData(warehouseVisitorId, customData);
         }
     }
}
init();
Alternatively, this is the equivalent piece of code you can use when configuring the custom data with the acquisition method "Custom JavaScript code":
const warehouseVisitorId = anyClient.getThisVisitorId();
const taskId = "your_task_id";
const attributeName = "place_of_birth";

 if (typeof window.kameleoon_configured_warehouse_attribute === 'undefined') {
     window.kameleoon_configured_warehouse_attribute = null;
     Kameleoon.API.Data.retrieveDataFromRemoteSource(warehouseVisitorId, function(data) {
         if ("warehouseAudiences" in data) {
             if (taskId in data["warehouseAudiences"]){
                  const city = data["warehouseAudiences"][taskId][attributeName];
                  window.kameleoon_configured_warehouse_attribute = city;
             }
         }
     });
 }
 if (window.kameleoon_configured_warehouse_attribute === null) {
     return null;
 }
 return {"value": window.kameleoon_configured_warehouse_attribute};
You can then create a Kameleoon segment that targets the name of the city in the custom data value. If you want to target multiple cities in one segment, you can add several Or conditions to the same custom data when building the segment.
Note that here the taskId is the Ingestion Task's unique number identifier that is found in the user interface where the task was defined.
You can add as many visitor attributes as you like in the SQL request and use these attributes in many ways with our SDKs.
Visitor identification
Modern apps and websites use many external tools and often many visitor identifiers. For this feature to work, the visitor identifier you use in the above code examples to retrieve the JSON object must be the same identifier extracted from your warehouse.
How this visitor identifier is generated is up to you. There are many possibilities. You can use identifiers that are only obtained after the user logs in to your solution, such as an email address. You can use anonymous identifiers if your business doesn't require or support logging in. You can even use a mixture of both if you have a use case where you want to target users whether or not they're logged in.
You are in charge of your data warehouse and managing the table that Kameleoon queries from, so there are no limitations, except that the identifier must be available for tracking at some point.
The Kameleoon Customer Success Team can advise you on choosing an identifier based on your specific setup, external tools, and business requirements.