
In this article:
– How to create and run a simple experiment straight from your Shopify Store to increase your e-commerce transaction rate
Let’s say you want to test different variations of your product page and measure how visitors interact with it regarding several key KPIs such as the number of add to cart, access to the checkout funnel, and ultimately increase the number of orders.
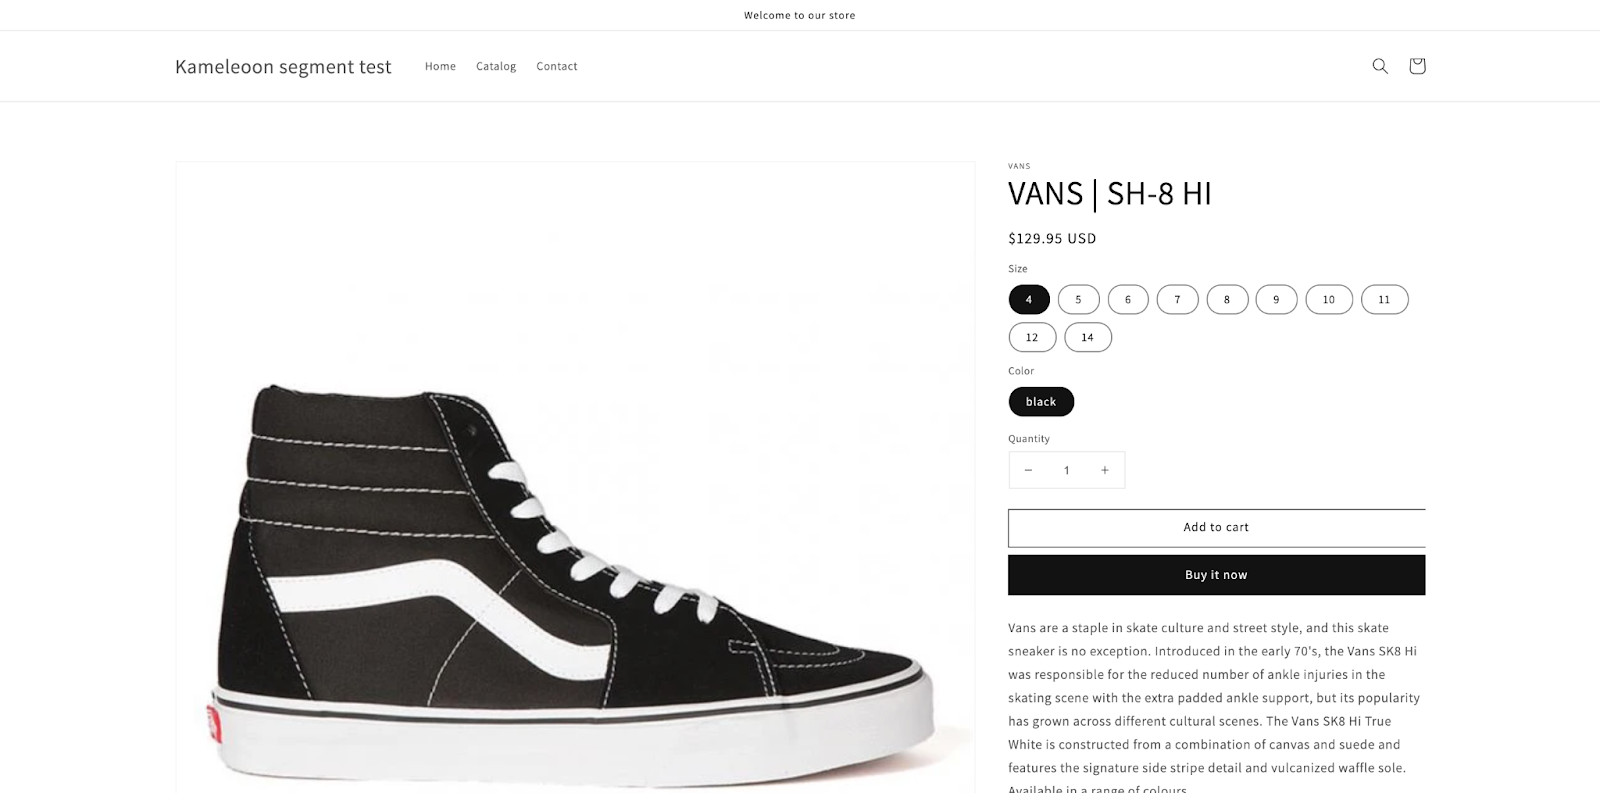
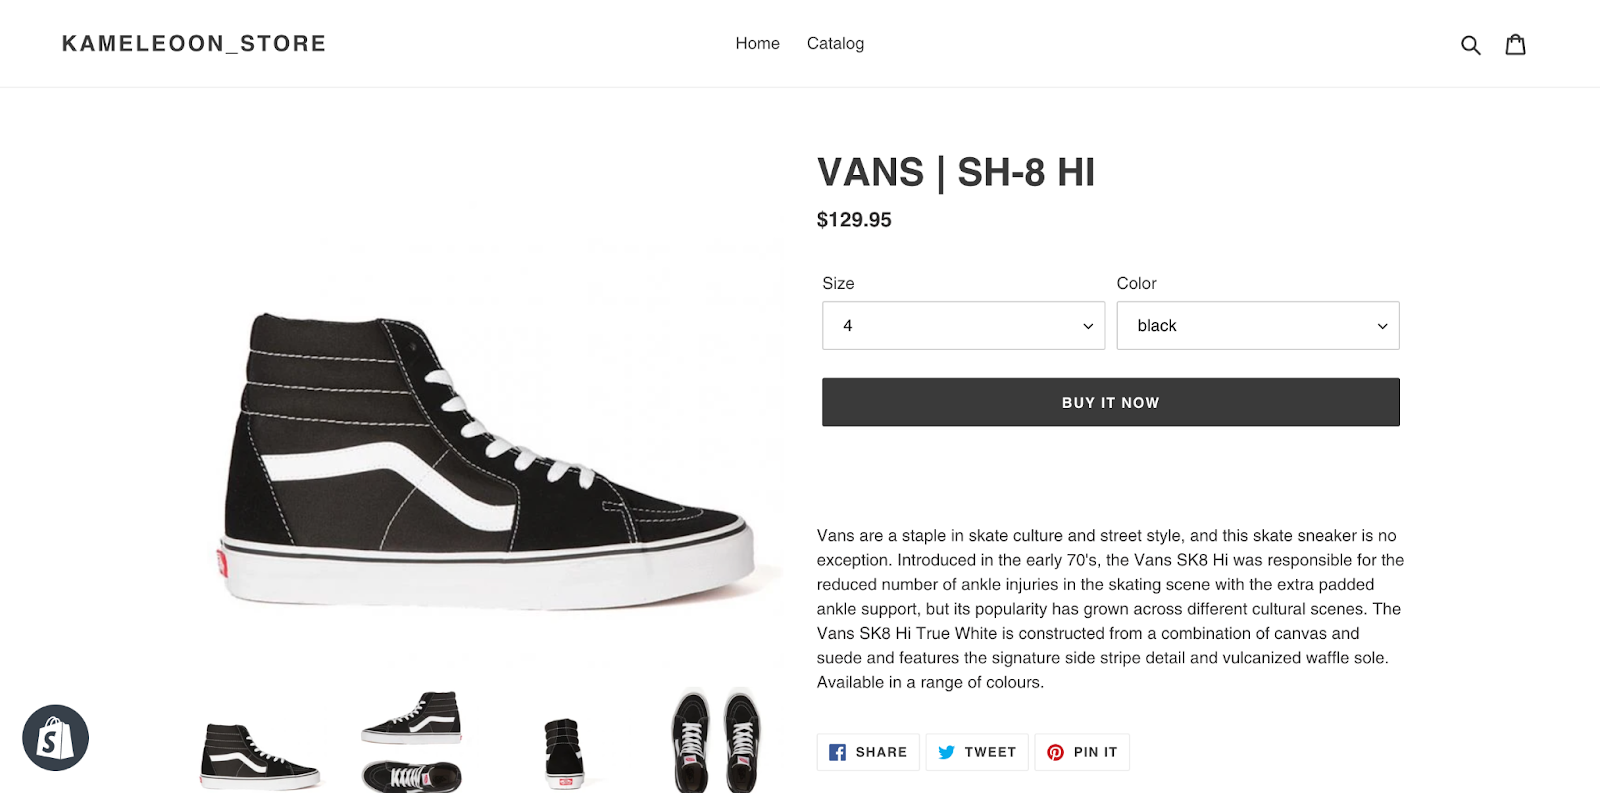
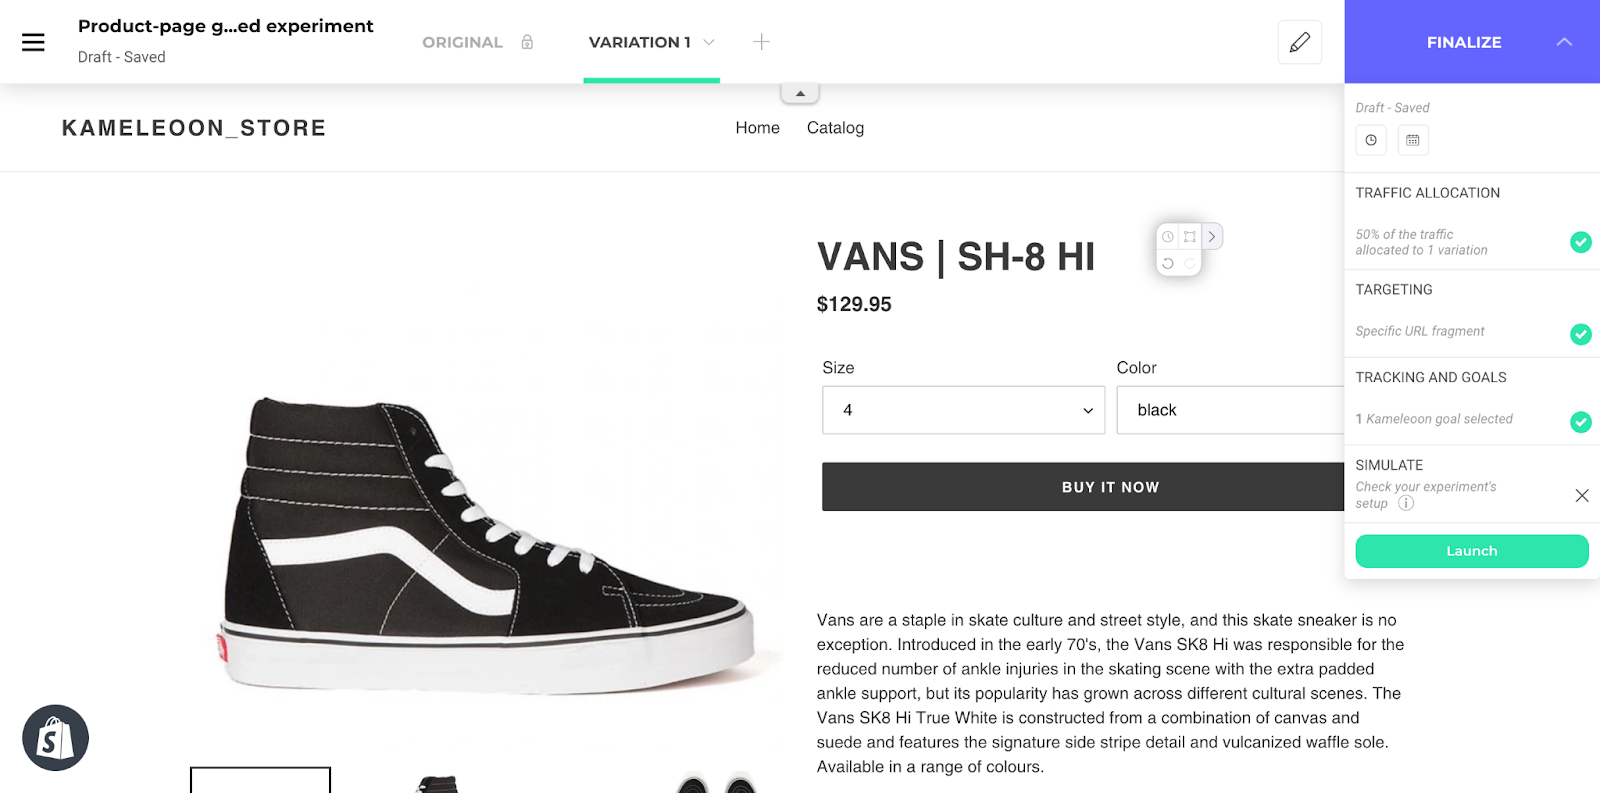
Imagine for instance this product page. A user can either choose to buy the product now or just add it to the cart and continue his navigation on the website. But what if most of your visitors just purchase 1 product on average ? You could then display only one CTA Buy it now to make the checkout faster for your visitors.
There are several ways to create such experiments with an A/B testing tool such as Kameleoon. Fundamentally, you can either:
- perform a split URL test: each variant of your experiment is a different Shopify product page URL and then you use the A/B testing tool to split your traffic equally by redirecting visitors to a page URL B, C, etc, of your product page.
- create your variants by using a graphic editor, visually or by injecting some JS / CSS code if you have coding skills.
- use a JS SDK from Shopify’s liquid source code to activate/disable a piece of code (let’s say variant B) for some of your users.
Let’s deep dive into each of them.
But before that, don’t forget that you will need to install Kameleoon on your Shopify store to be able to run experiments. If you run web experiments, you can use our Shopify x Kameleoon App that smooths this process and we recommend you read our documentation about it. If you run feature flags or feature experiments, please follow the guidelines described in this documentation.
Split URL testing
A split URL test is an A/B/n test where different users are shown different URLs (variants) of the same page. It is a very classic and common way to run an experiment by simply redirecting the end user to a different URL of the same page for each variant of your experiment. Indeed, in Shopify, you can easily achieve this by using Shopify’s alternative template URL parameter so that you can have several URLs of the same page. eg.
https://kameleoon-segment-test.myshopify.com/products/vans-sh-8-hi
https://kameleoon-segment-test.myshopify.com/products/vans-sh-8-hi?view=version-b
The ?view= parameter in the second link is Shopify’s alternate template URL parameter. This powerful feature of Shopify enables you to have several versions of any page templates: product, collection, cart, checkout, etc and use them in a Split URL experiment.
So let’s see how this experiment can be configured in Shopify and Kameleoon now.
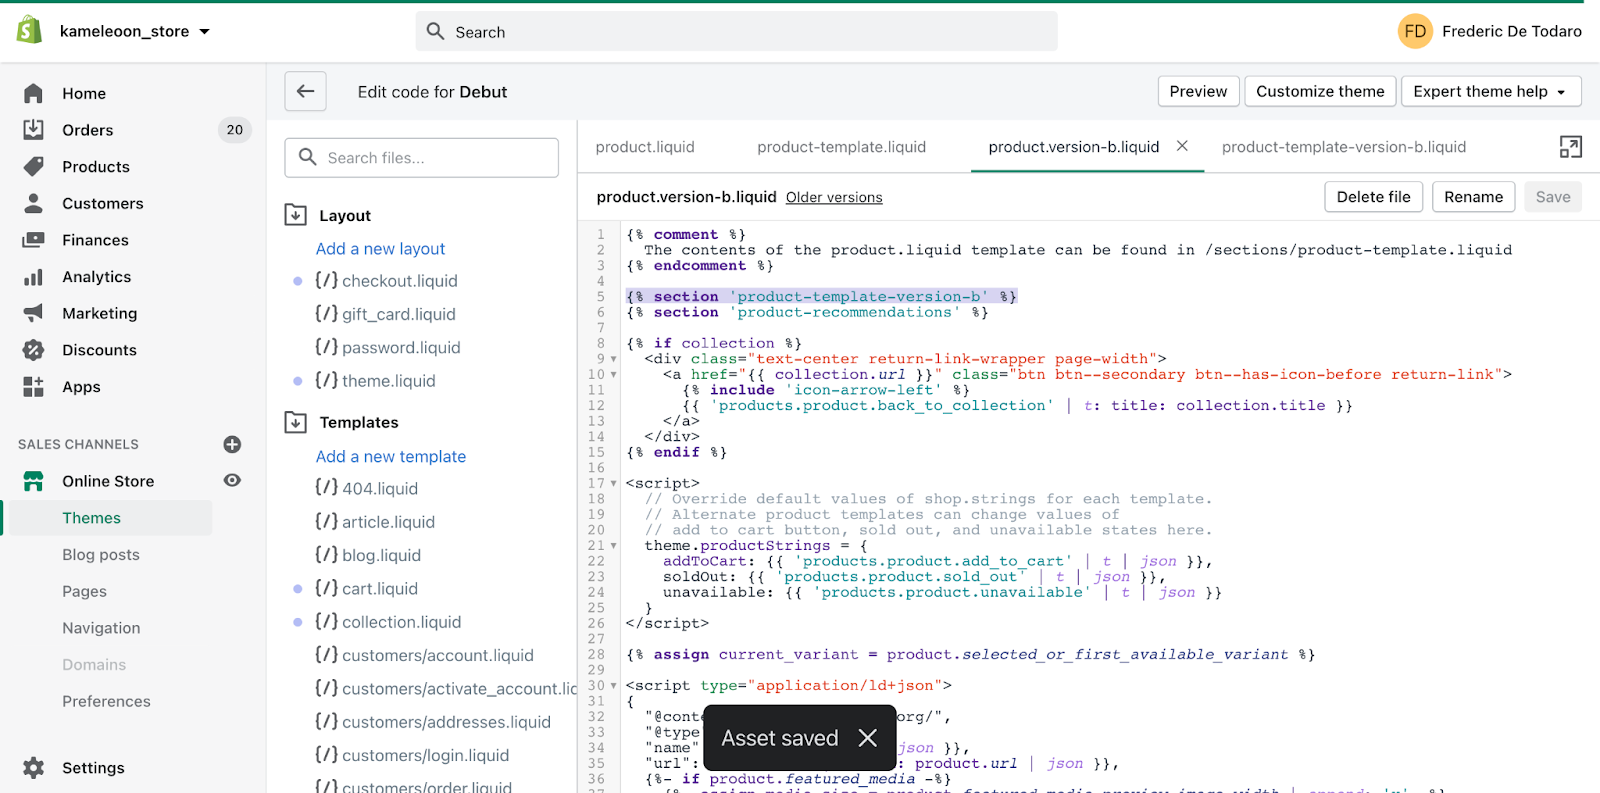
In your Shopify admin console, go to Online Store > Themes > Actions > Edit Code and search for your product.liquid template. Here, we can see that our product.liquid file has actually two sections: product-template which contains the source code of the product page and product-recommendations which contains the source code of the product recommendation block “You may also like”.

To put in place our Split URL experiment, we will need to add an alternative product.liquid template (for our variation B) and to duplicate the product-template section to remove the code that manages the Add to cart button. To do that:
- Click on Add a new template and configure it as below. We have named it “version-b” but you can choose whatever name you want. Just remember that this will be visible in the product page URL for some of your visitors, so choose the name wisely.
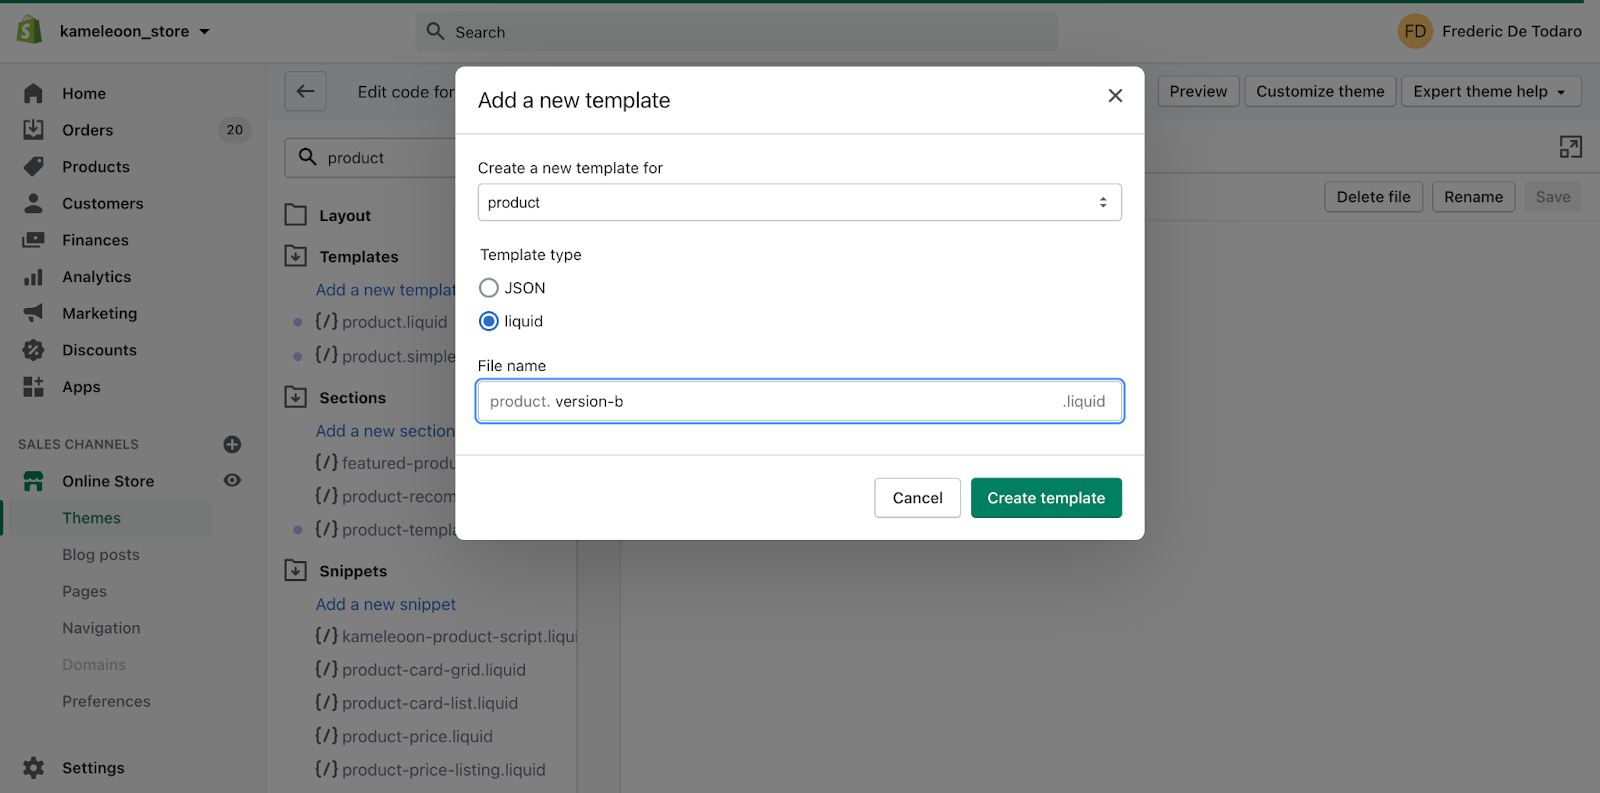
- Click on Add a new section, name it “product-template-version-b” and copy-paste the code of our original product-template.liquid file.

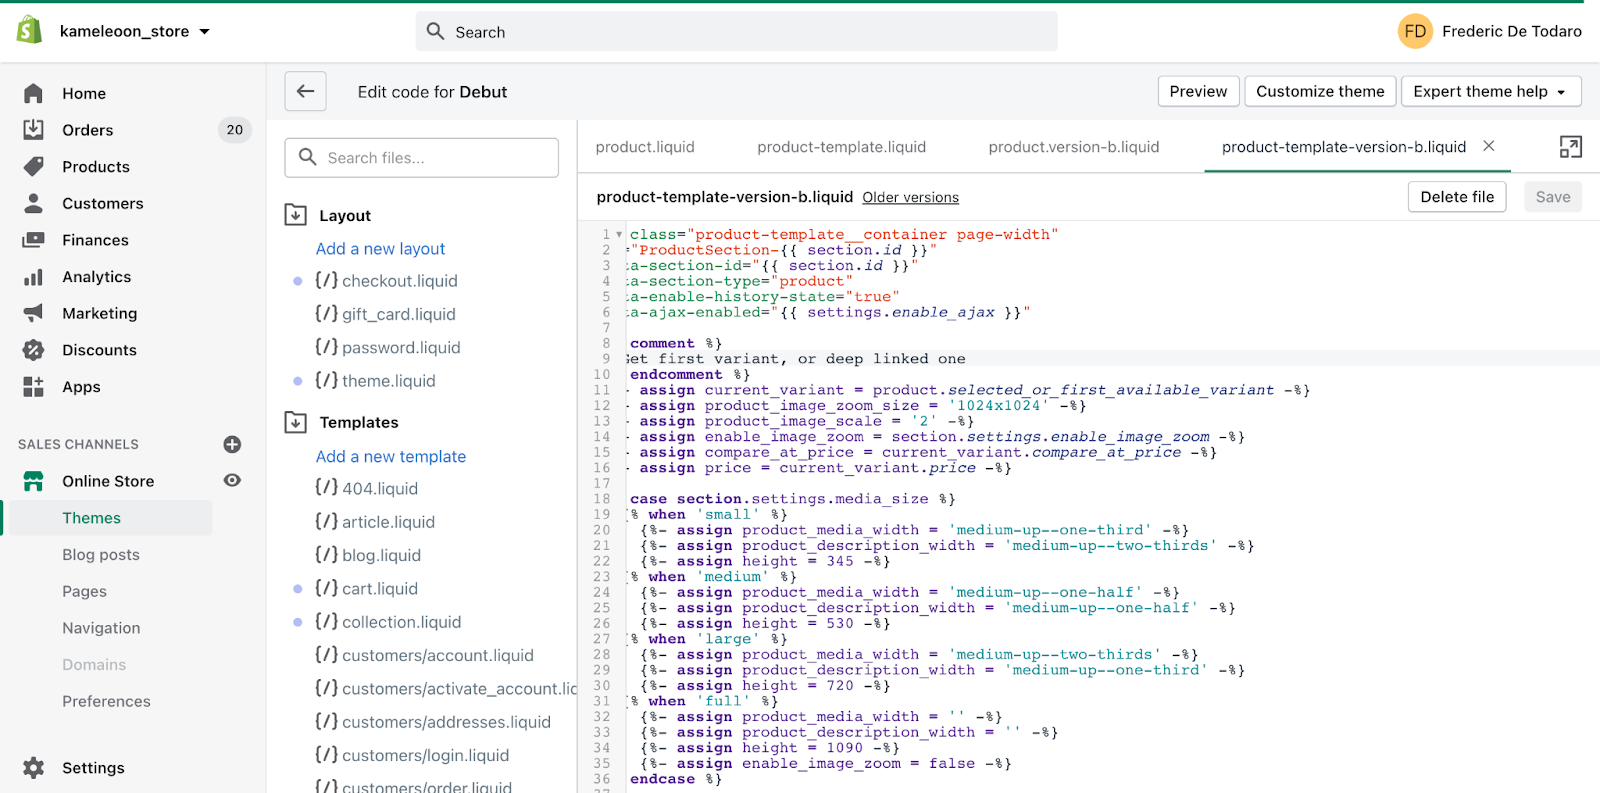
You should now have 4 liquid files as below:
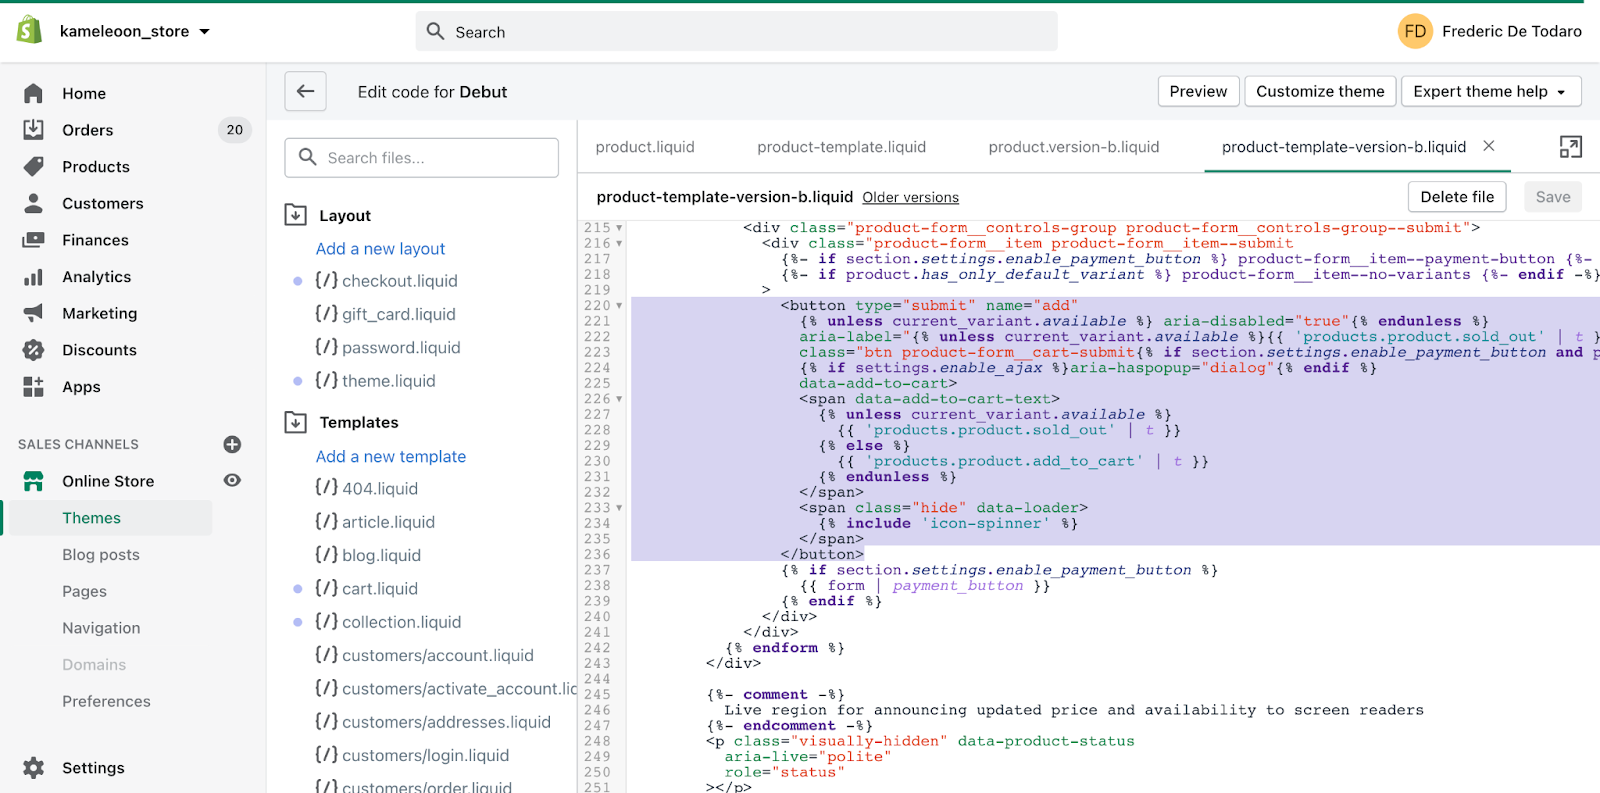
Now the last step to have our Variation B ready, is to remove the Add to cart button code from our section product-template-version-b.liquid.
And finally we need to call our modified section B from our alternative Shopify product page product-version-b. It should look like this. Easy, right?
Save everything and you are now done! You now have a beautiful version B of your product pages.
Shopify allows you to access alternate template files if you pass the view parameter with a value that matches a template file in your theme. So, by adding the parameter ?view=version-b to any product page (eg. https://kameleoon-store.myshopify.com/products/vans-sh-8-hi?view=version-b), you should now see a product page without the Add to cart CTA, which is exactly what we wanted to.
Most of the hard work has now been done. Now let’s configure our Split URL experiment in Kameleoon so that 50% of our visitors will see Variation B of our product pages instead of the original one. You will see, it’s fairly easy.
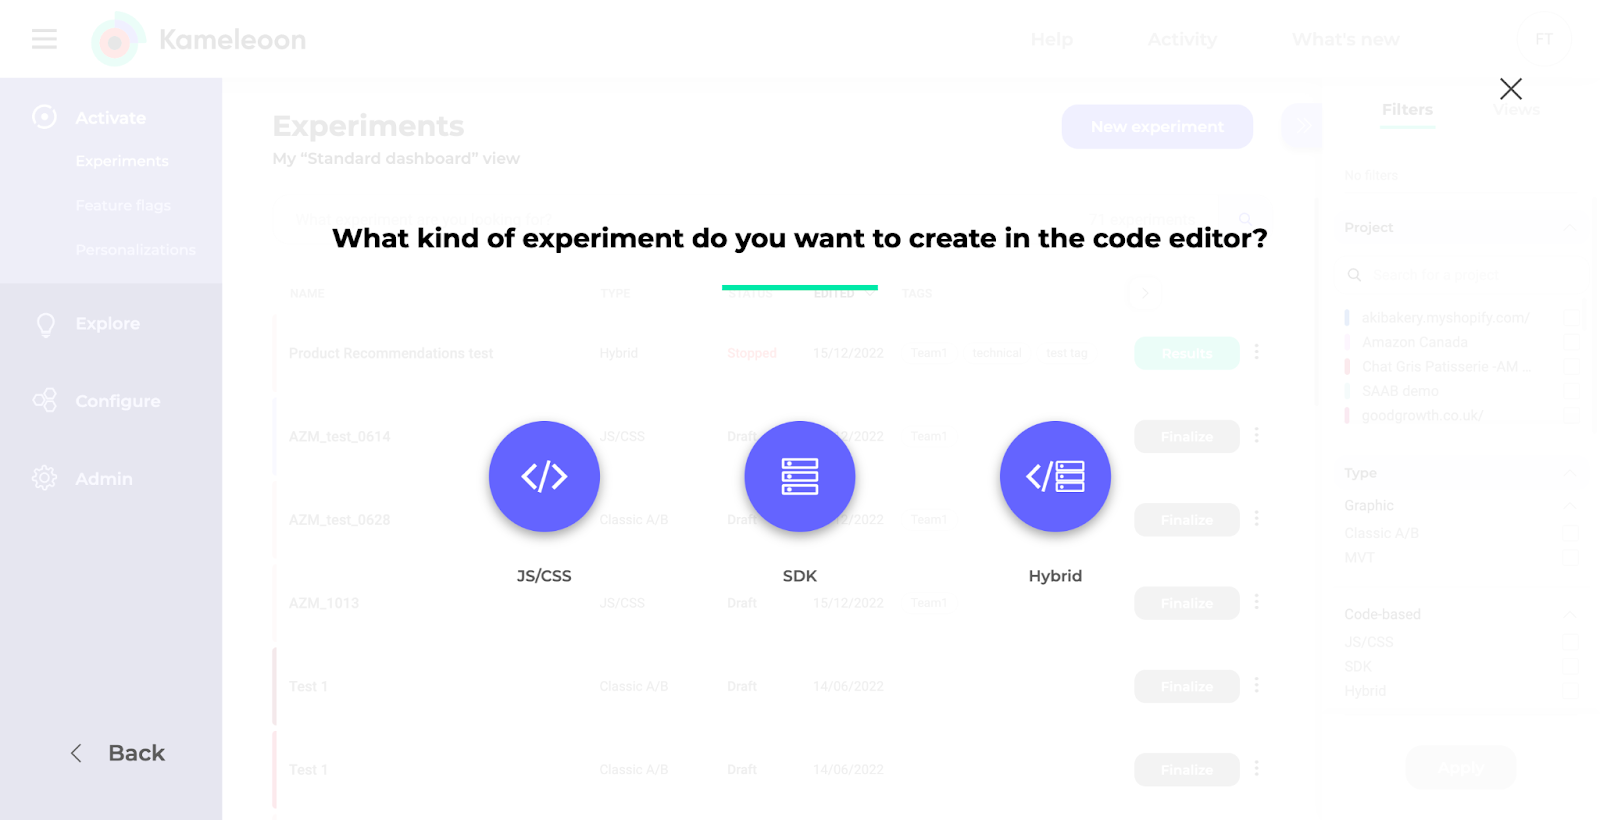
Go to https://app.kameleoon.com and hit the New experiment CTA and choose the In the code editor option, and then the option JS/CSS. It will open the code editor so that you can configure your experiment.
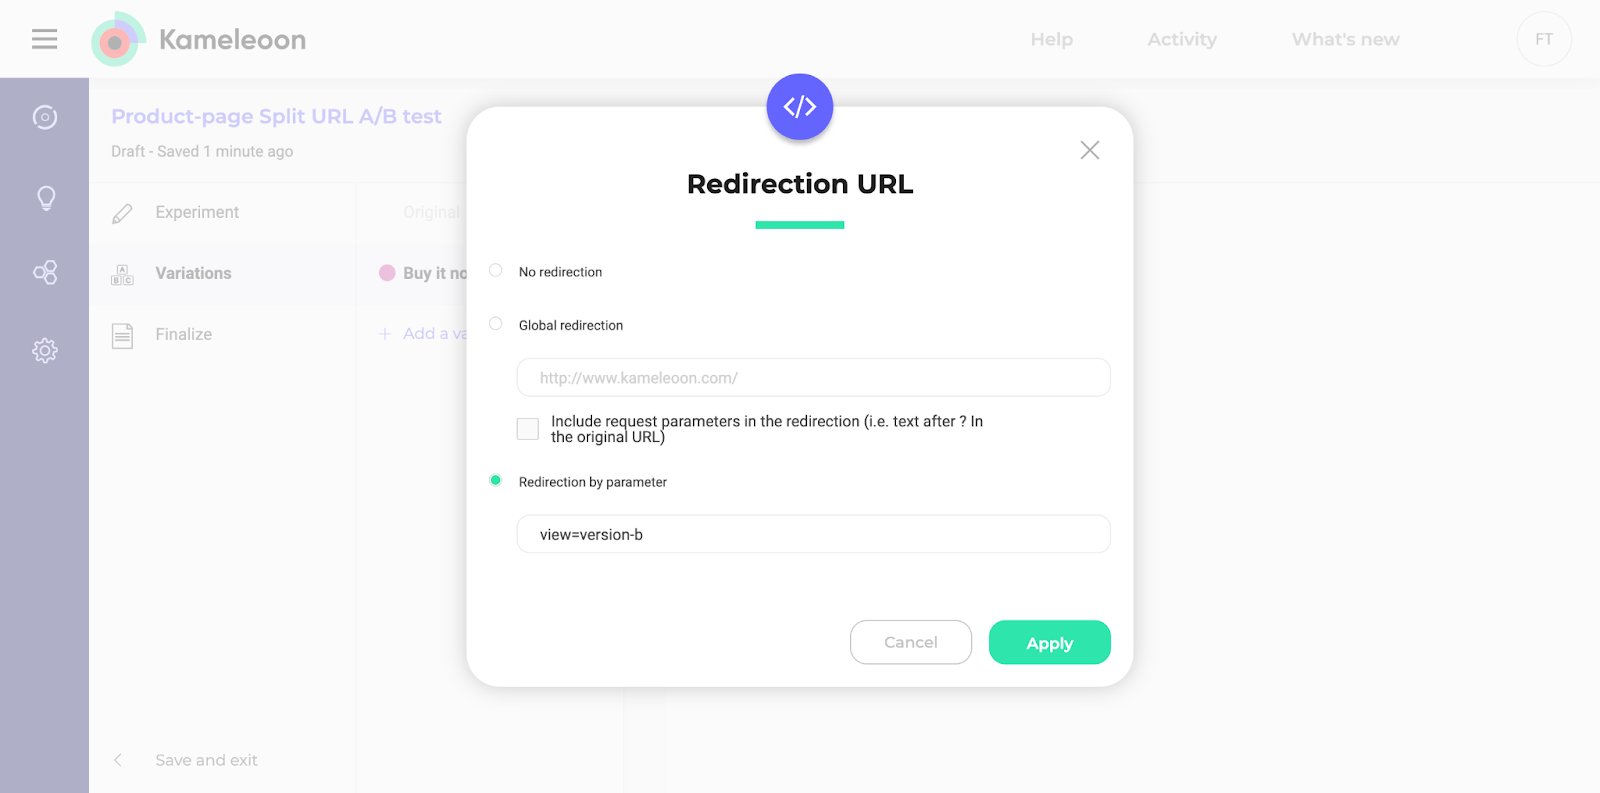
Click on Variation. By using the 3-dots menu, you can rename your variation and most importantly configure the alternative URL for your product page by using the Redirect to a URL feature.

In the popin that opens, choose the last option Redirection by a parameter and put here our Shopify’s alternate template URL parameter view=version-b.
Now your variation B has been set up. Great! The last and final step, I promise, is to finalize your experiment configuration to launch it live on your website. For this, click on the left Finalize tab of the code editor. You will need to set up the Traffic allocation, the Targeting and how you would like to measure the success of your experiment.

As we want to run this experiment for 50% of our traffic and for visitors looking at our product pages, the configuration of the targeting should only target your product pages (URL containing “/products/”) and you should also exclude URLs containing the additional parameter “view=version-b” to avoid an infinite redirect loop.
Lastly, we’ll choose which KPI this experiment will measure. Ideally, we’d like to increase the number of orders. You can choose the KPI Shopify orders which is being tracked automatically by Kameleoon if you have installed our Shopify x Kameleoon app.
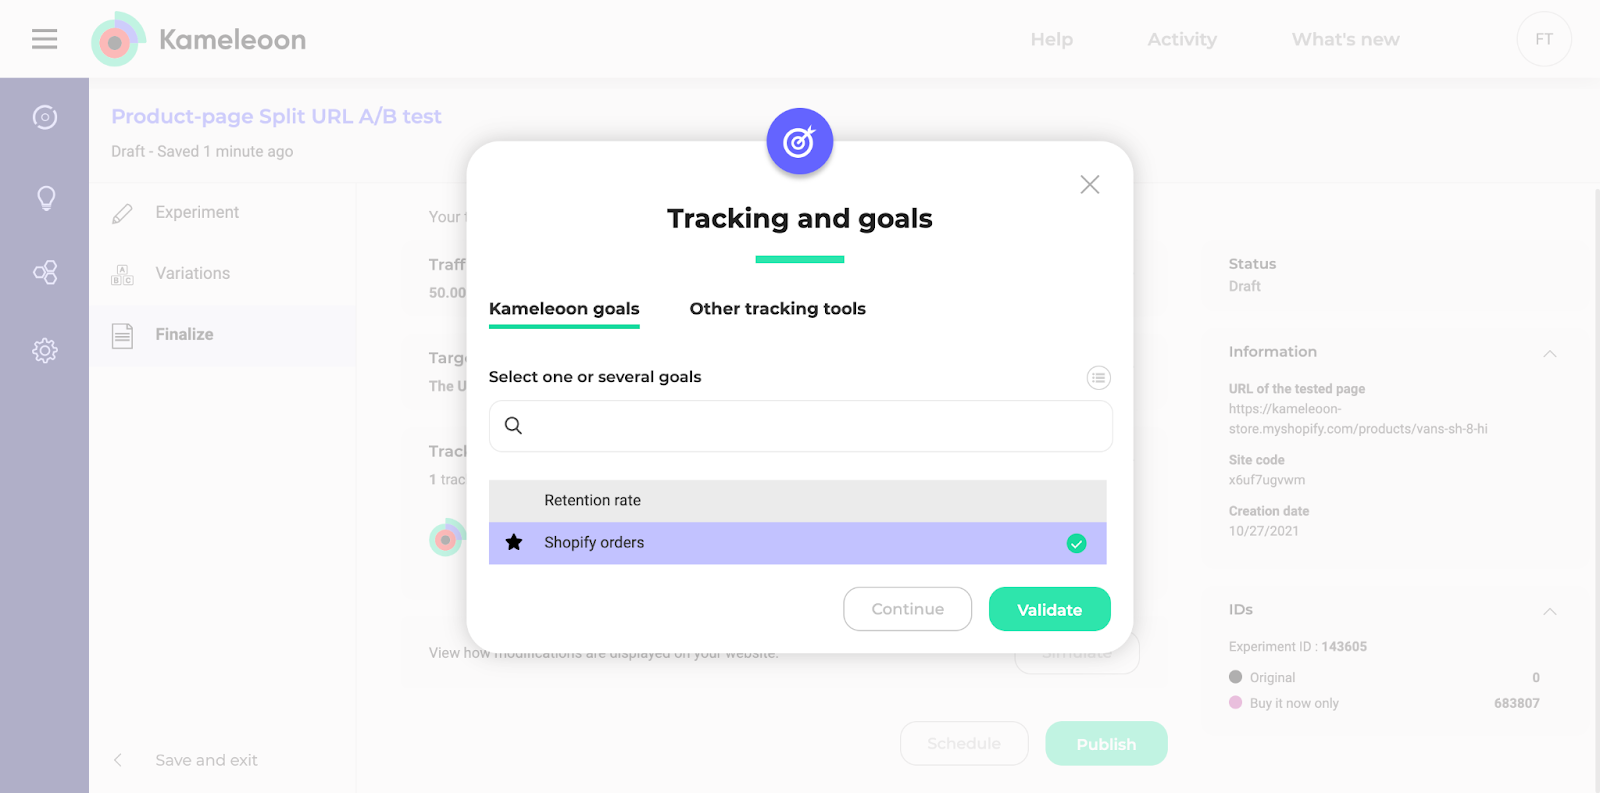
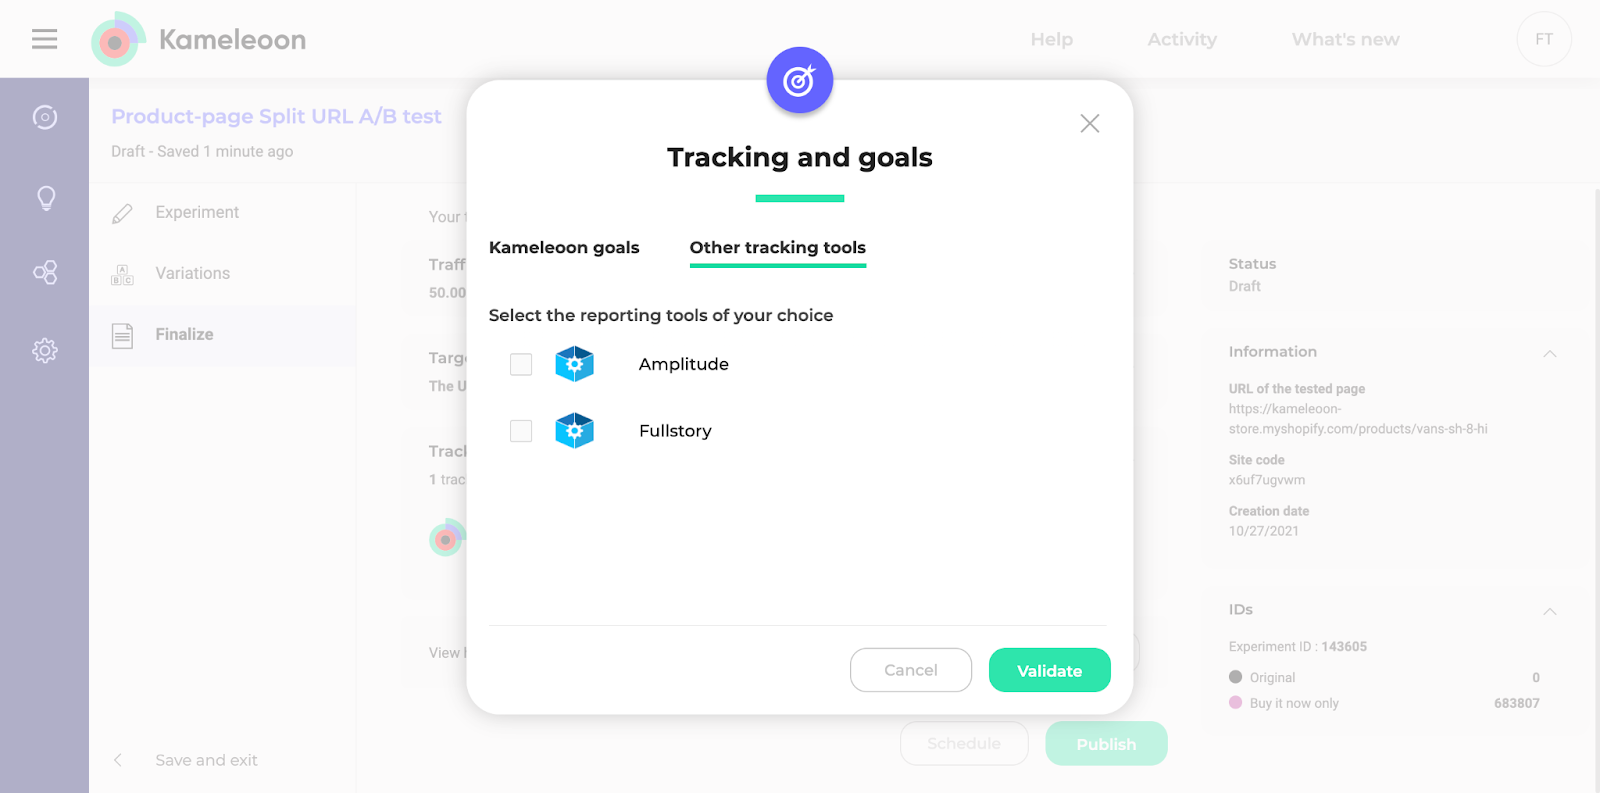
Additionally, you can send the data to the Analytics platforms of your choice. Here, we use Amplitude and FullStory.
That’s it. Your experiment is ready to be pushed live in production ! Great job !

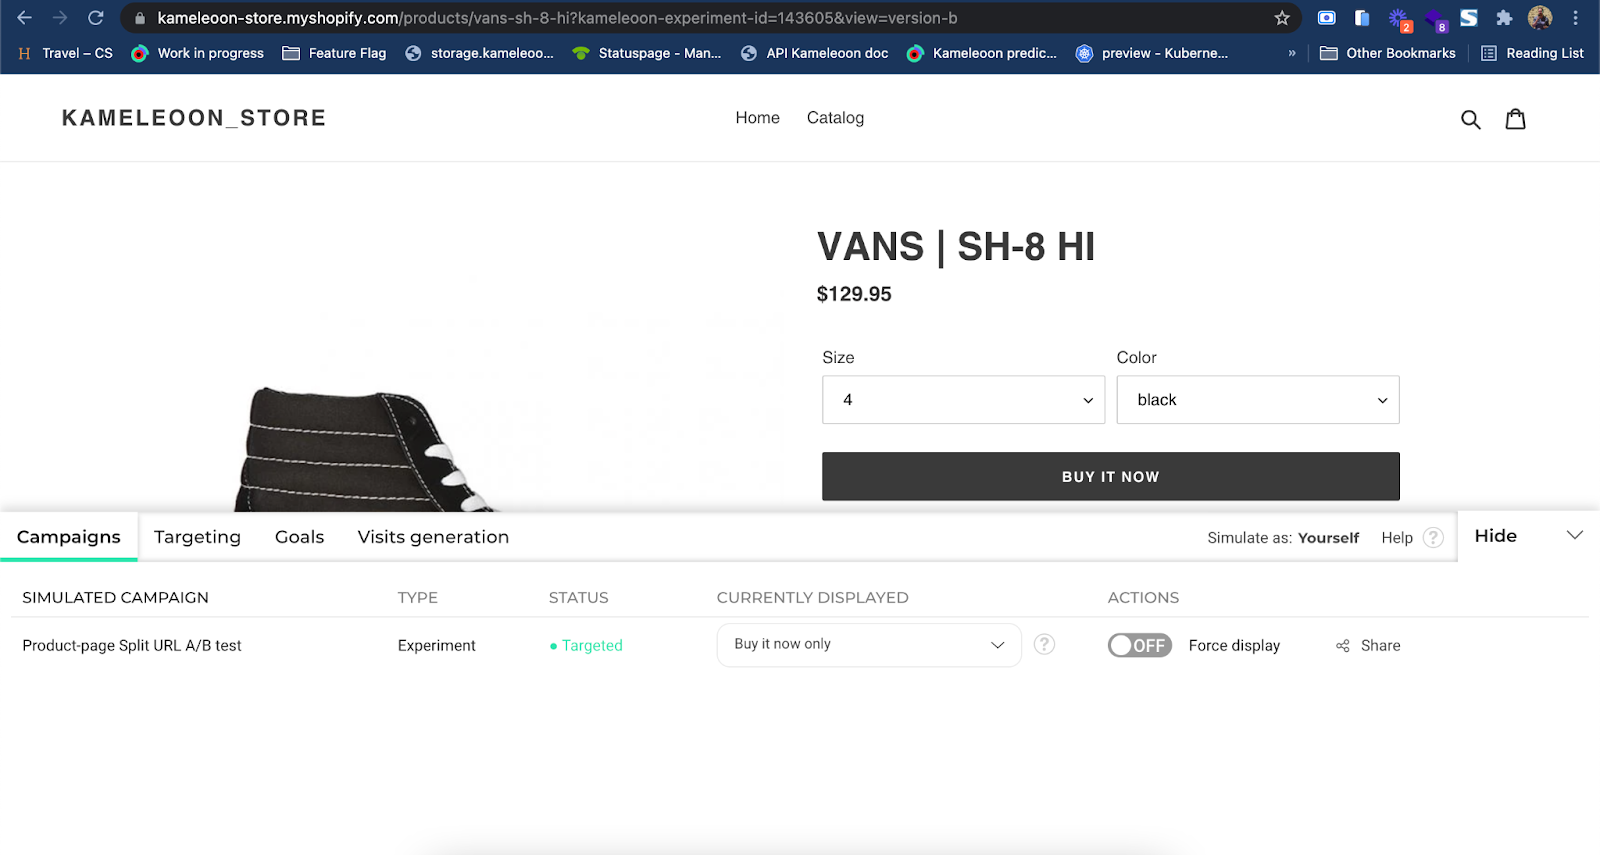
You can Simulate your experiment first (highly recommended). It will allow you to easily test that you are being redirected to our URL B when you bucket yourself in the variation Buy it now. For instance, here in the URL, it works perfectly as the Shopify URL parameter (view=version-b) is being added automatically by Kameleoon.
Once you are done with the QA, then go back to Kameleoon and hit the CTA Publish to start the experiment.
Experiment data will then start gathering as soon as a first targeted visit has ended on your store. As a rule of thumb, we recommend waiting 2 to 3 weeks depending on your traffic before choosing which variation is the winning one. Kameleoon will tell you exactly when you can stop the experiment by looking at several indicators: statistical significance, uplifts, stability of the data over several days, etc. We highly recommend you read this documentation which explains everything about the Kameleoon stat model.
The Split URL technique we have put in place with these simple steps can be replicated with all the other page types of your Shopify store: cart, collection, search, etc, as seen below.

Create variants with a graphic or code editor
We have seen in the previous section how to create in a few steps a split URL test by using Shopify’s alternate template URL parameter which is highly powerful if you know exactly which section of your templates you need to update to create a variation B and you also have technical skills as you need to change the source code of your liquid files.
Creating variants of a page from a graphic or code editor is also a convenient, quick and highly powerful and flexible way to run an experiment. Instead of doing a redirect to an alternate page B, in this case, the A/B testing tool hides on the fly the Add to cart button. The good news about this technique is that it’s being done so fast that your visitors will never notice they are being A/B tested and seeing a potential version B of the page.
The clear benefit of it is the ease of creating these experiments. Kameleoon offers an intuitive graphic editor that lets you delete, edit or rearrange elements on a page. The main disadvantage of it is that as soon as you want to push advanced modifications, it will require some technical skills in JavaScript and CSS. The good news is that Kameleoon also allows that thanks to a powerful code editor.
Now let’s configure our experiment in Kameleoon. Go to https://app.kameleoon.com and hit the New experiment CTA and choose the Classic A/B option. It will open Kameleoon’s graphic editor directly on the product page URL of your choice.
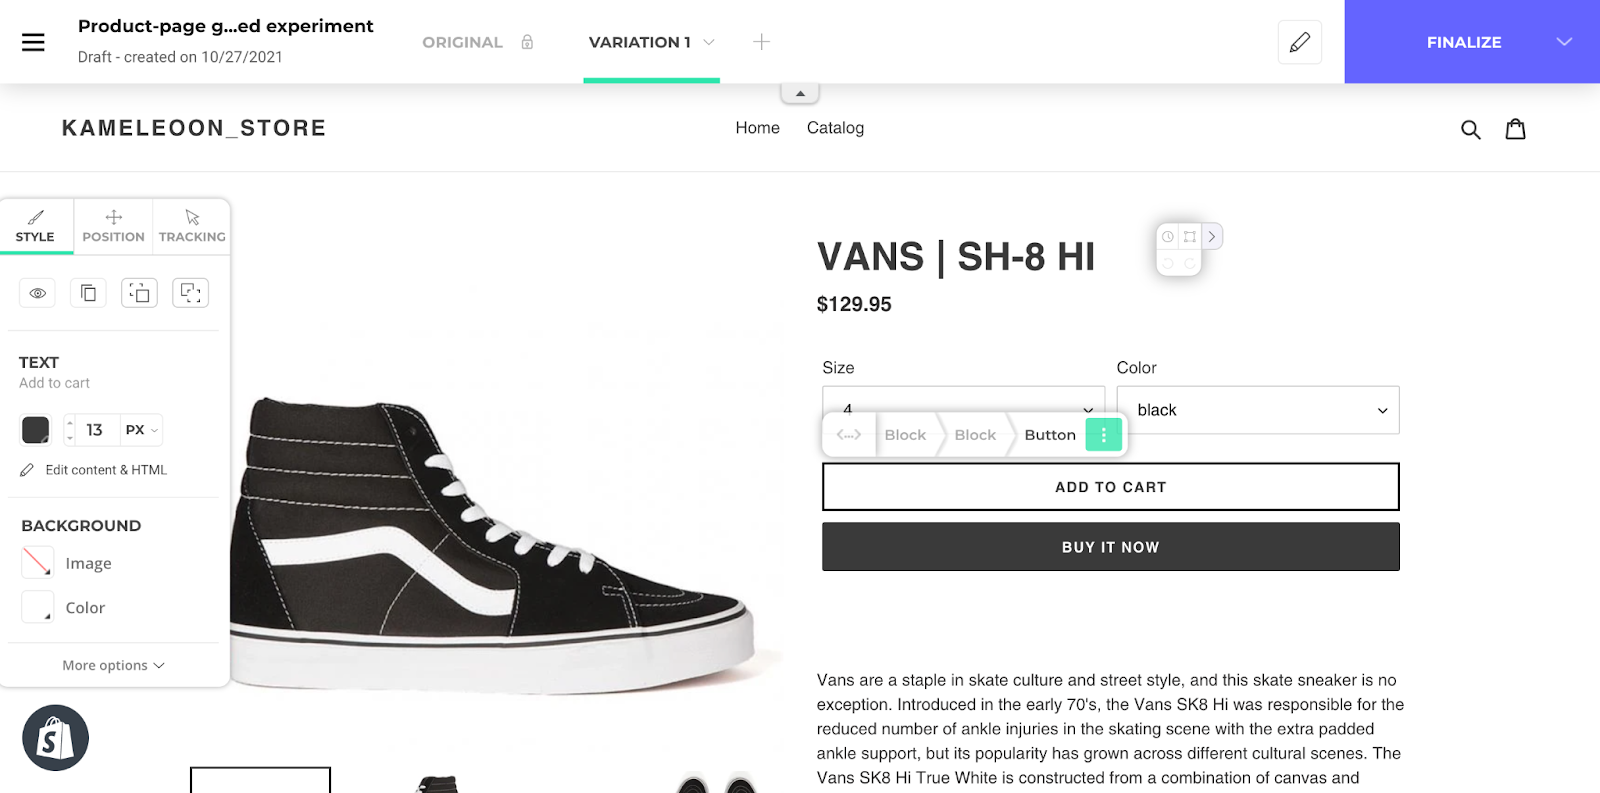
Then that’s the fun part: select the add to cart button and just hide it by clicking on the Hide button in the left side panel. Done, your variation B is ready!

Finalize the experiment and configure your experiment exactly the same way as for the Split URL one: 50% traffic allocation, targeting all /products/ pages, measuring on the Shopify Orders KPI.
As for the Split URL experiment, we highly recommend to Simulate your experiment on your device and test if the variation shows well on all product pages.

Then, hit the CTA Launch to start the experiment live in your store. That’s it, fairly easy isn’t it?
You could have achieved exactly the same result by adding some easy CSS or JavaScript in the variant by using Kameleoon’s code editor.

Use the JS SDK from Shopify’s liquid source code to activate / disable features
Using feature flags controlled a JavaScript SDK to activate/disable a piece of code directly in your Shopify product.liquid file for some of your users is the most advanced and technical option of the two previous techniques we described above. It is highly powerful though if you want to manage your features and release them progressively to your visitors. If you are getting started with this technique, we strongly recommend you read first this deep piece of content on our blog.
Usually to run Feature Flags or Feature Experiments, you will need to install a SDK on your application server. Server-side SDKs, usually live on your tech stack (on your servers or the services you use on the server-side) and take care of bucketing your traffic into variants of your page, and other logistics, such as targeting the right users and tracking the experiment results. They’re deeply embedded into your back-end tech infrastructure. But in the Shopify world, this is not easy to achieve as you are not actually owning and managing the application server and so you cannot easily run a server-side SDK there. However, Kameleoon still offers an alternate way of running Feature Experiments / Feature Flags on the client-side via our JS SDK. If you love changing things around in your liquid files, that’s the option I strongly recommend you use.
Go to https://app.kameleoon.com and navigates to the Feature Flags menu and then hit the New feature flag CTA. You can follow the guidelines described in this documentation to get started.
You feature flag should like this. One Experiment rule with several variations. “Off” being the control / original variant.
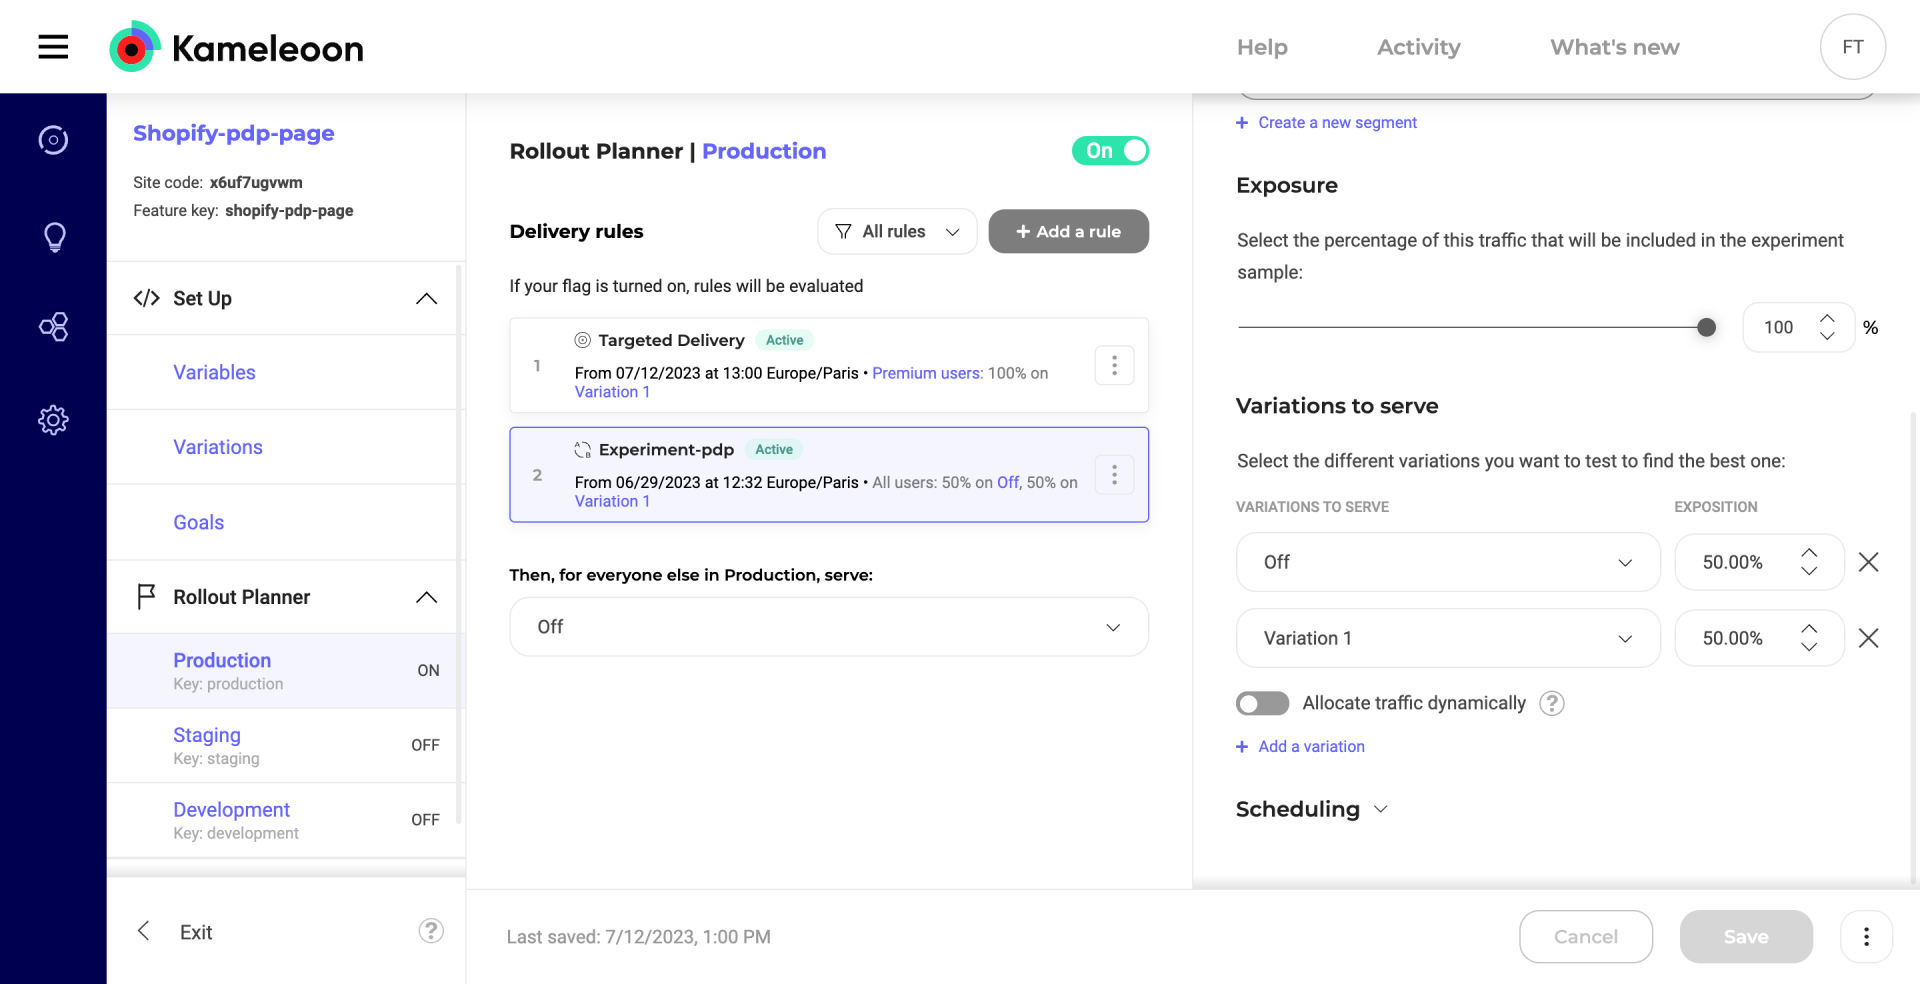
You will also need to note down the Feature Flag Key (in our example, it is shopify-pdp-page) to use it in your shopify liquid code.
The last and final step is now to write the logic in the product liquid template files that will enable / disable the Add To Cart CTA depending on the response given by the Kameleoon SDK for our experiment. If the visitor is bucketed in variation 1, we will basically hide the CTA, if it is in variation A (Off), we will display the CTA. Fairly easy, right?
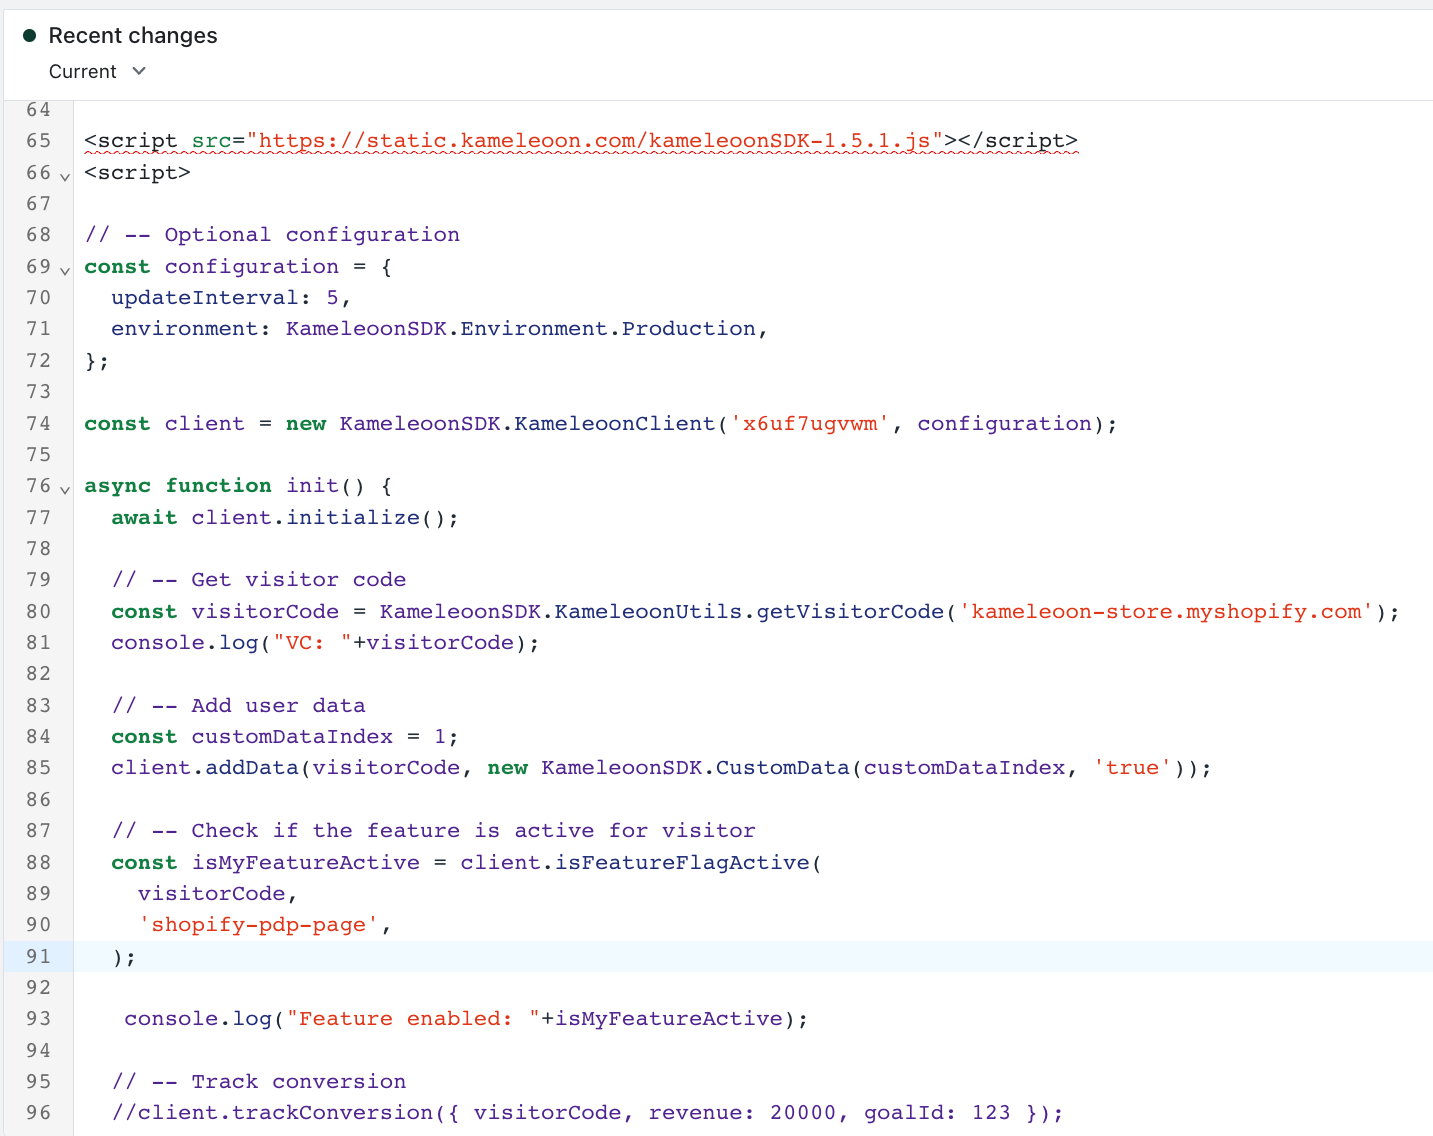
Below, is a simple code you could use to achieve this in our liquid template file. It does the following actions:
- it makes sure Kameleoon SDK client is loaded and initialized on the page.
- it checks whether the flag is live on the page and which variant the visitor is being allocated to.
In your Shopify admin console, go to Online Store > Themes > Actions > Edit Code and search for the product-template.liquid file which contains the source code of the product page and add the feature flag logic code.
Then save the file to update your store with the new code. Done! You have created your first Feature Experiment by using a Kameleoon SDK.
